
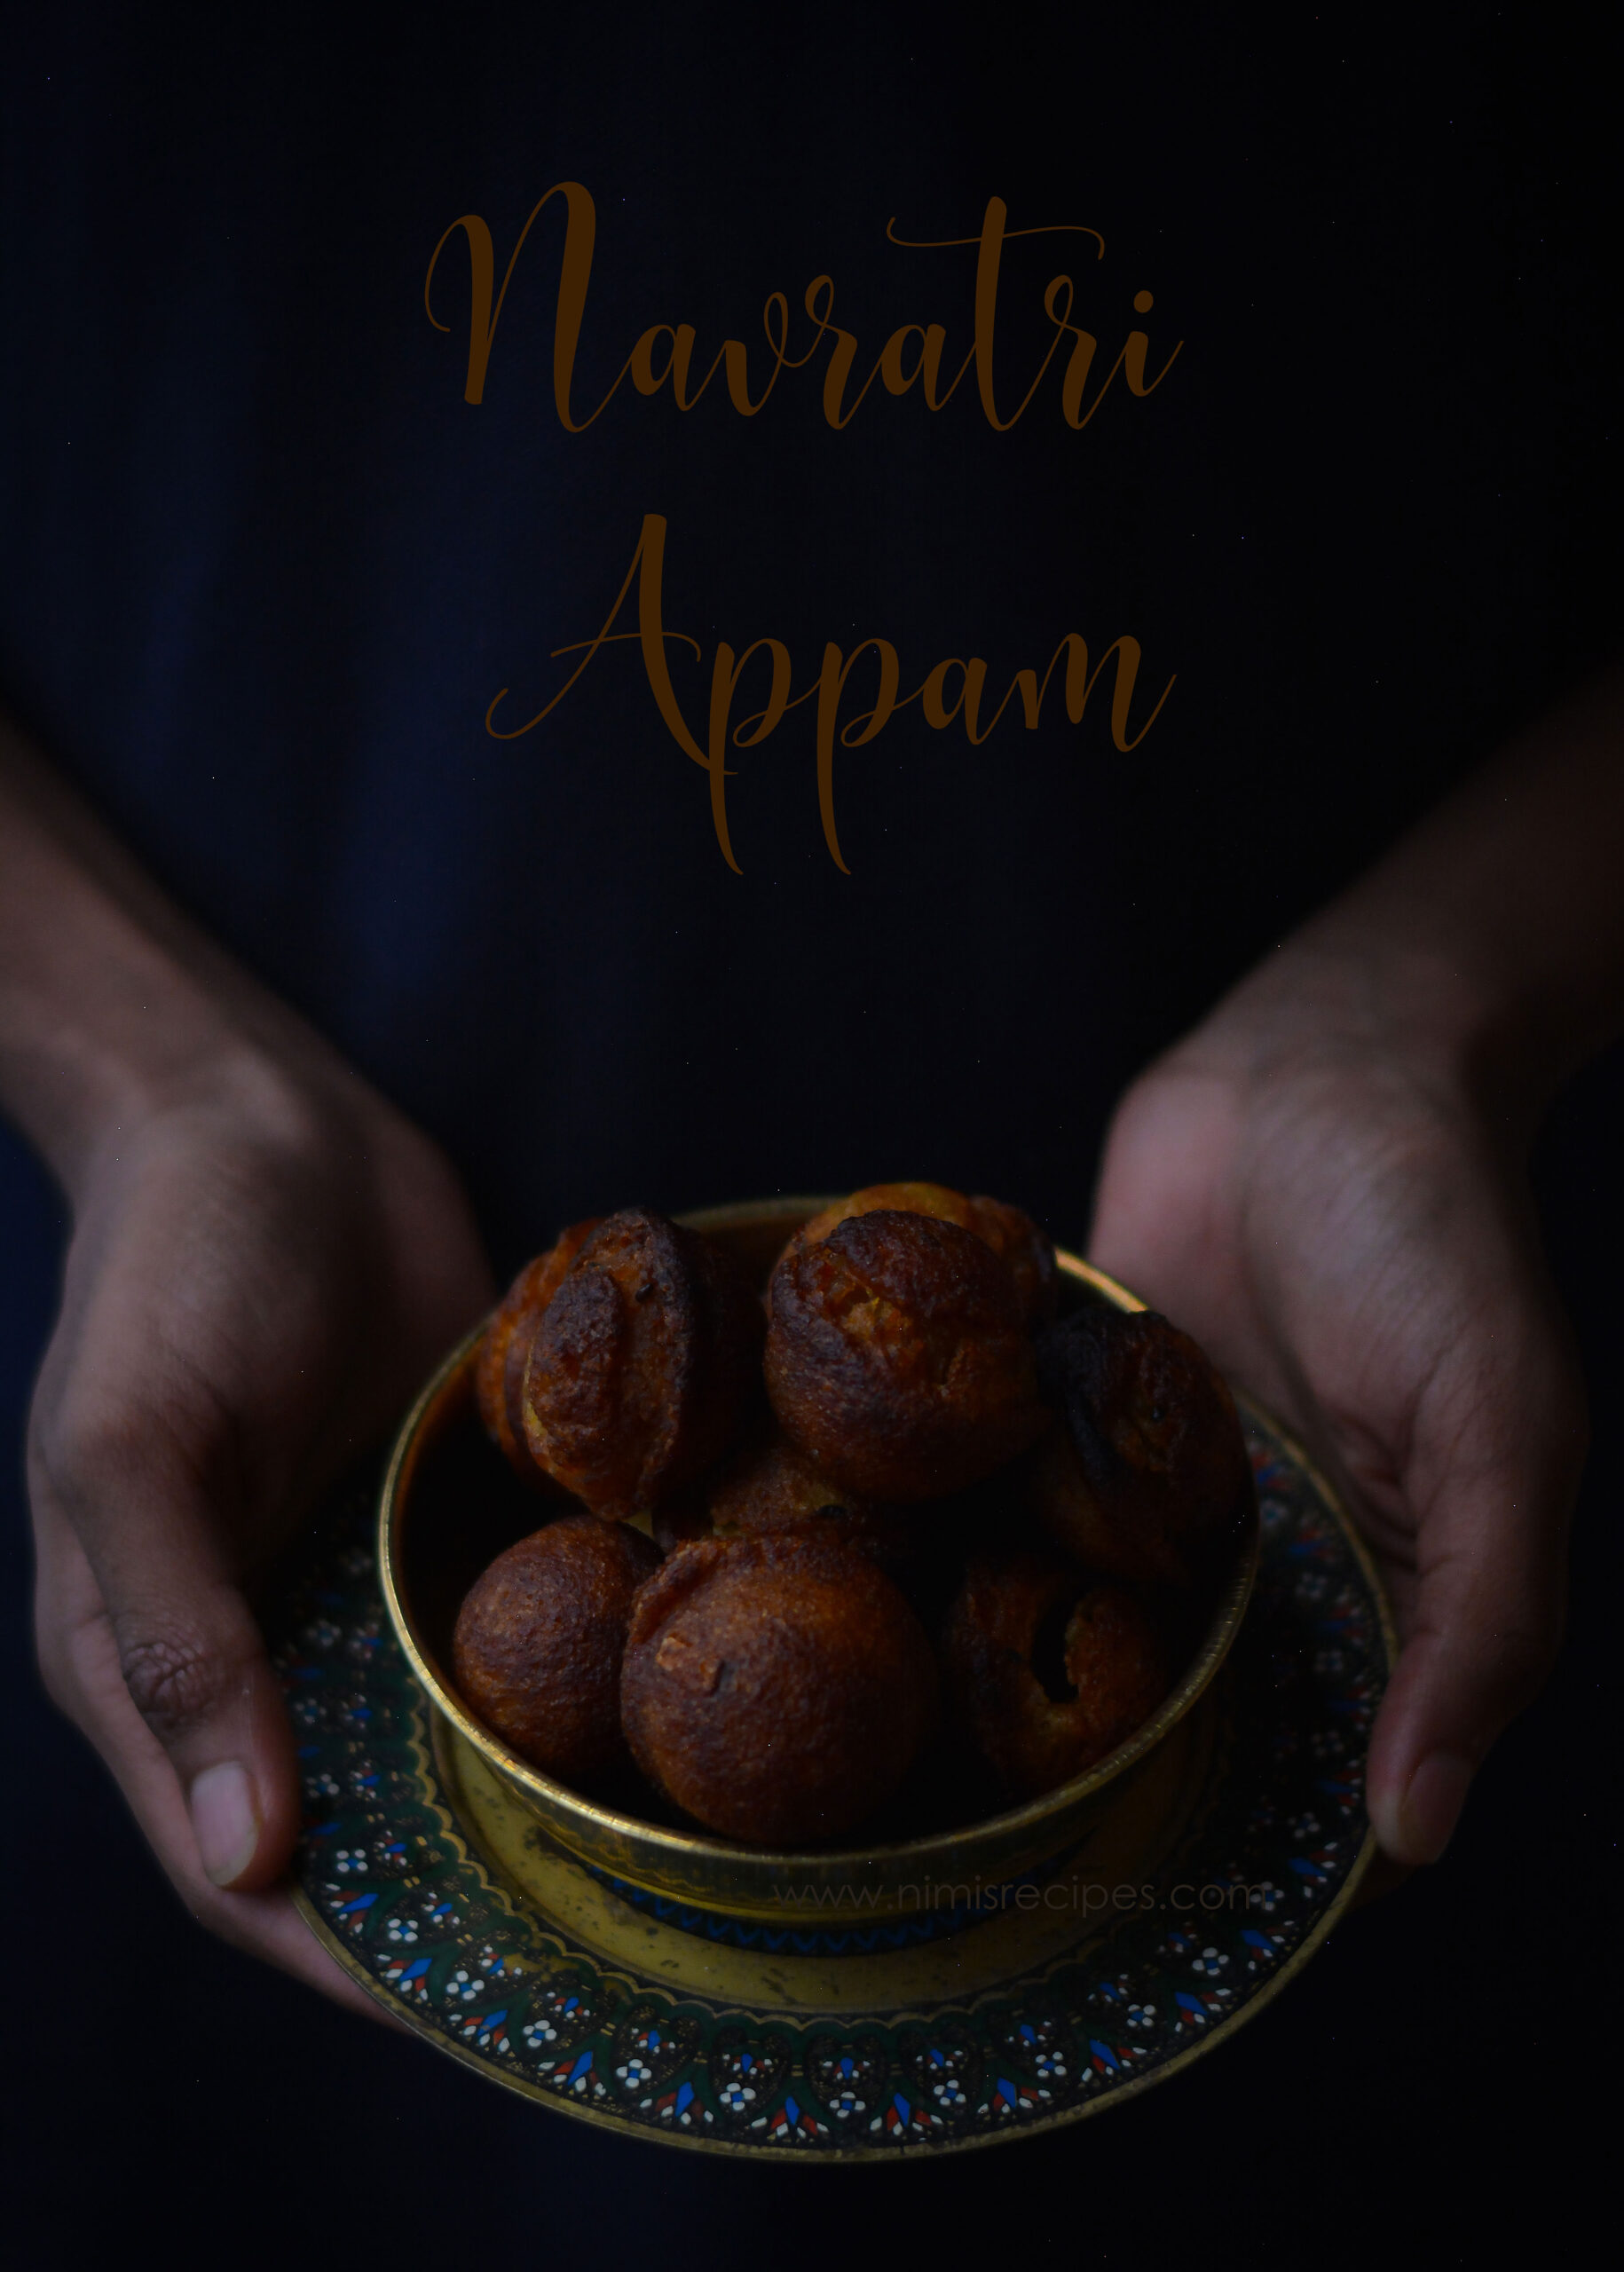
Navratri Appam for VijayaDashami !
Happy Vijayadashami to all of you!
Dusshera is also known as Vijayadashami and is a major festival that is celebrated at the end of Navratri every year. It is a celebration of the victory of good over evil.
The Vijayadashami day is the tenth and final day of the Navratri celebrations and is considered auspicious for beginning learning in any field.
In Kerala, Tamil Nadu, and coastal Karnataka, Vidyarambham is a tradition observed on Vijayadashami day, where children are formally introduced to the learning of music, dance, languages, and other folk arts. It involves a ceremony of initiation into the characters of the syllabary. People across the country worship nine forms of the Goddess during Navratri. Mostly in Gujarat people play Dandiya and Garba during the nine days of Navratri while praying to the Goddess. However, in the eastern and north-eastern parts of India people celebrate Durga puja with much pomp and fervor.
Navratri Appam is a recipe that was shared with me my mother .She learnt the recipe from a friend of hers. It looks quite similar to the unniyappam the traditional snack in Kerala. This Vijayadashami this was what we kept as an offering to the Goddess.
Navratri Appam
1 and 1/2 cup of Raw Rice( soaked in water for about 1-2 hrs)
Jaggery syrup(for sweetness according to taste-I added about 1cup )
2 ripe plantains peeled and sliced
2 tbsp of butter
1 and 1/2 tsp of sesame seeds(black)
3 tbsp of coconut chips
2 tsp of ghee
Wash the soaked rice and add it to the blender. Add in the sliced plantains, butter and grind into a coarse paste. Transfer the mix into a bowl, pour in the jaggery syrup with regard to the amount of sweetness required. In a skillet fry coconut chips and black sesame seeds and pour into the batter. Mix and leave it to rest for about 4-5 hrs. If you really want to cut down the time mix in 1 tsp of baking powder.
Normally, I would prefer to let it ferment a bit on its own. Once the batter is ready, heat a pan with oil.I have used the Unniyappam pan here to have them all of the same shape and size. Once the oil is hot, pour in the batter and cook it on both sides . Once they turn golden in color, drain them of the oil into a colander or on paper towels.
Serve them warm!
This was my offering for Vijayadashami today for the Puja!

.
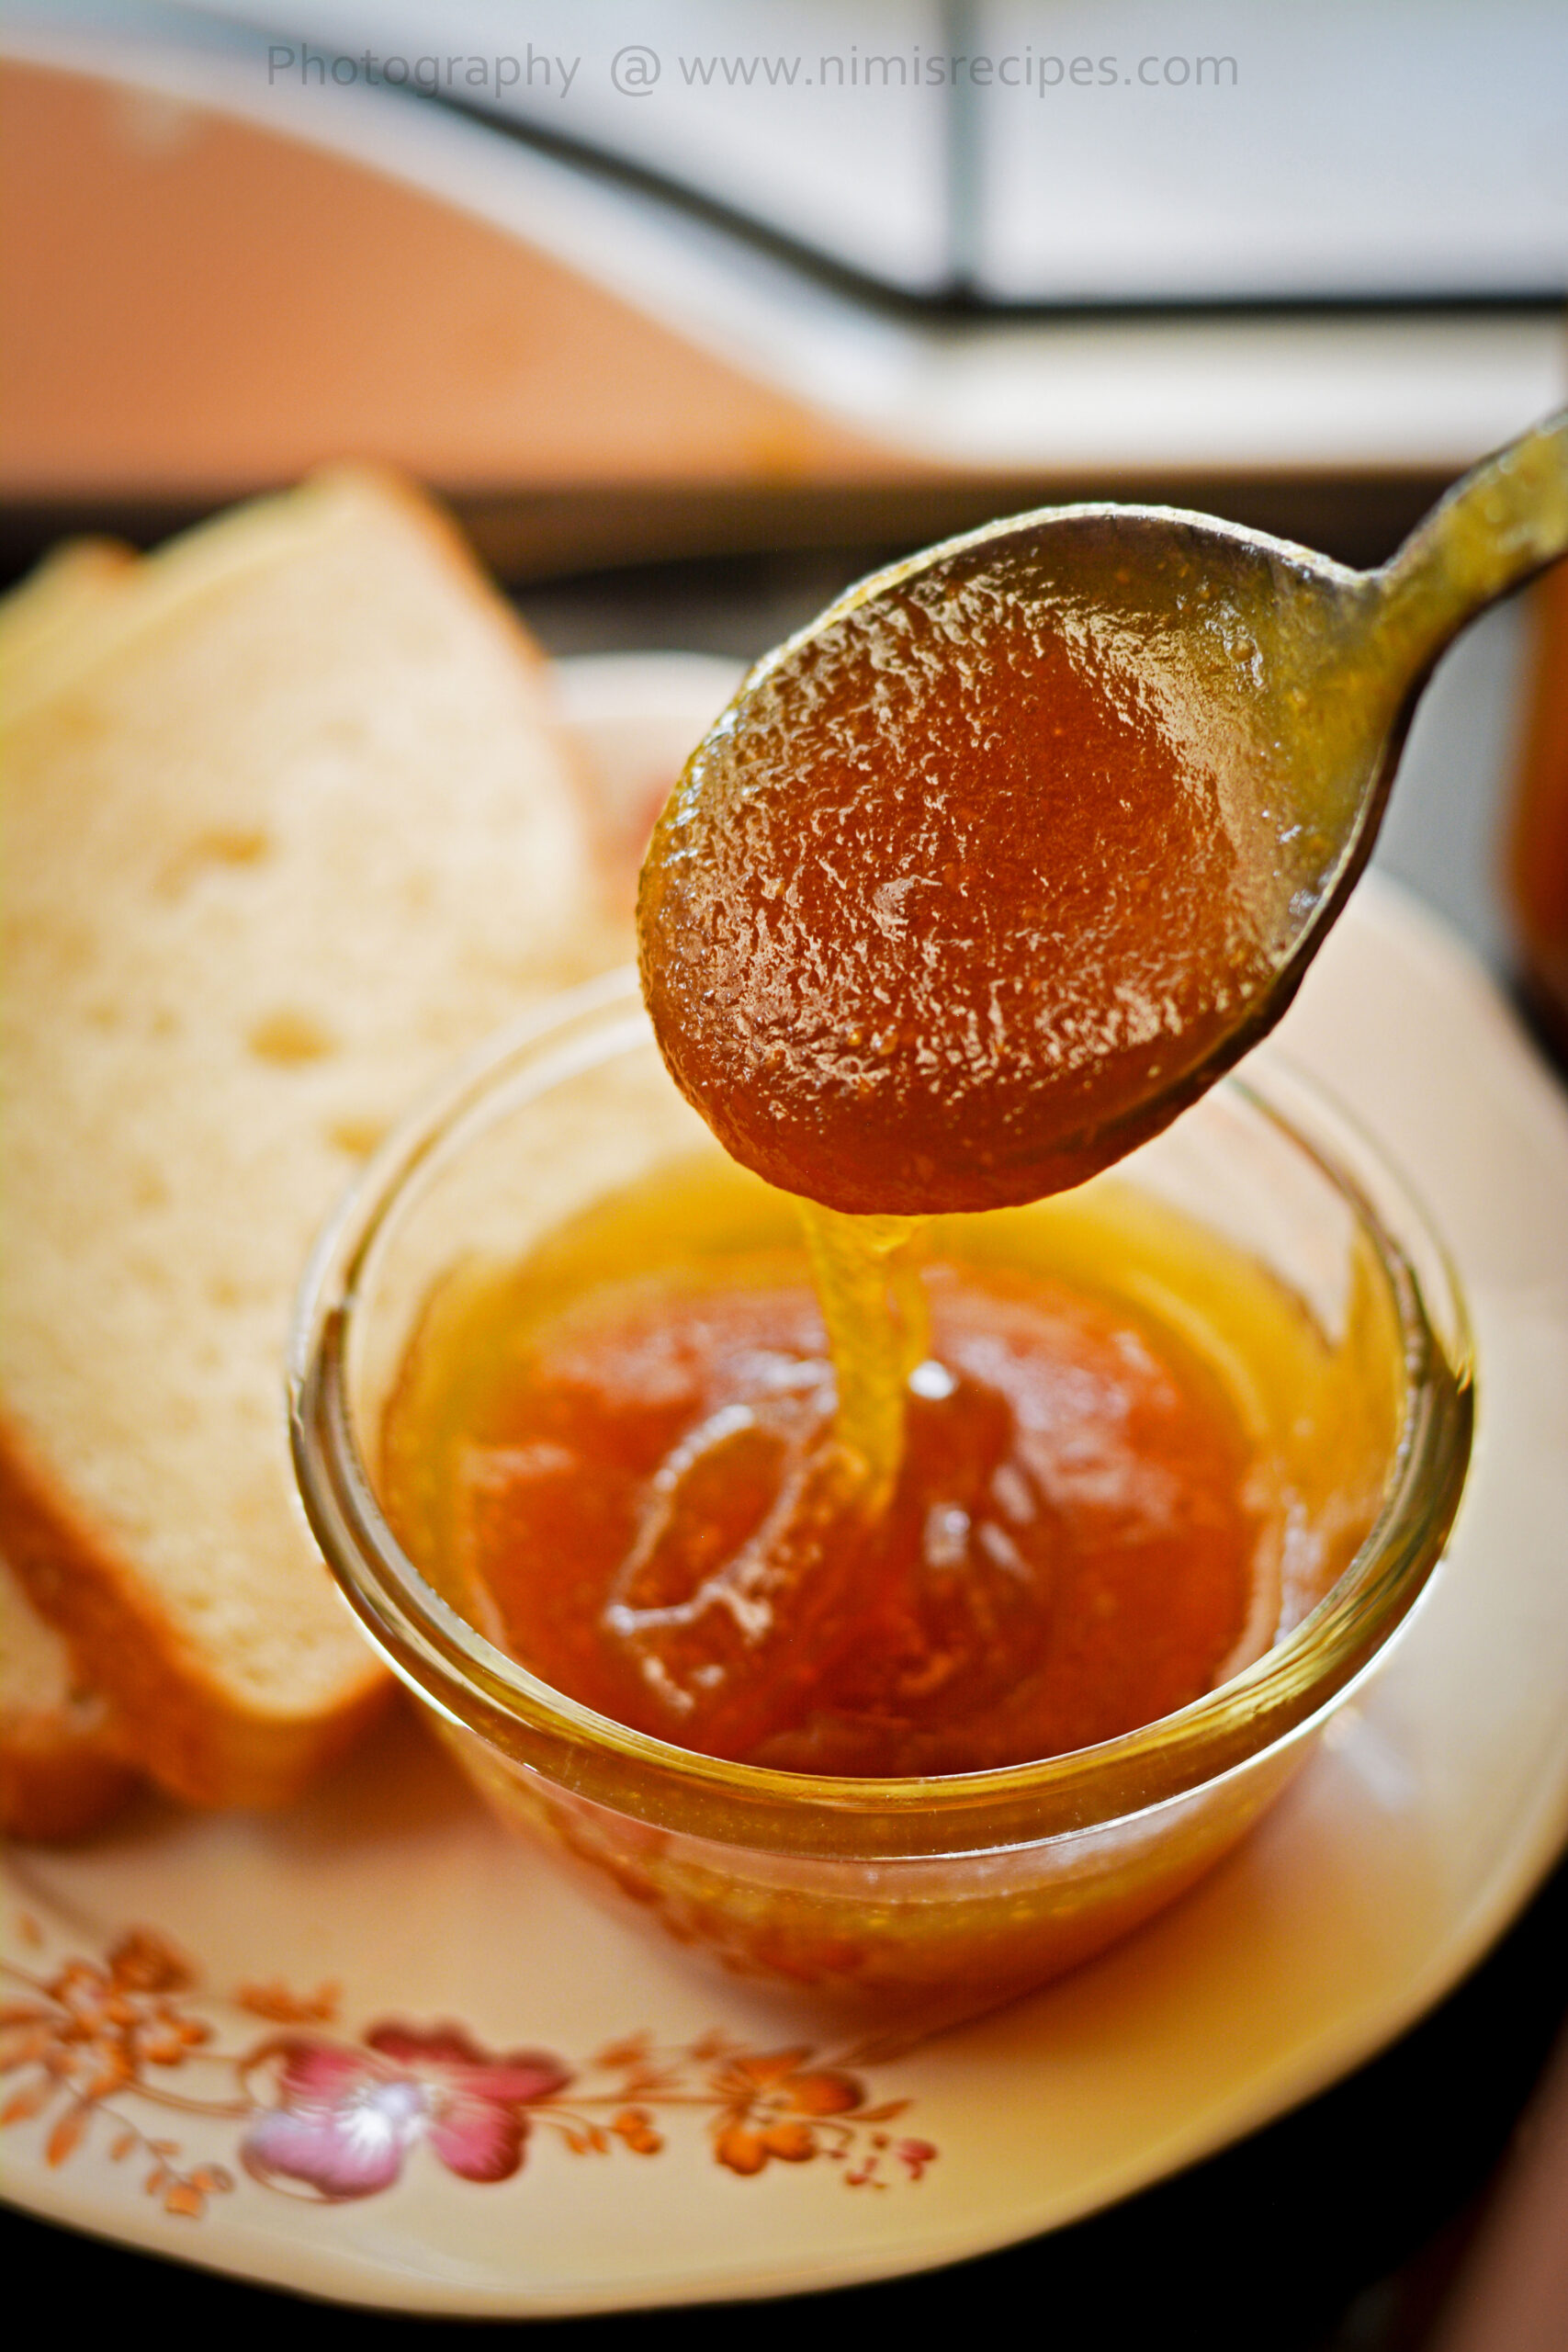
Jamming up Papaya and Pomegranate !
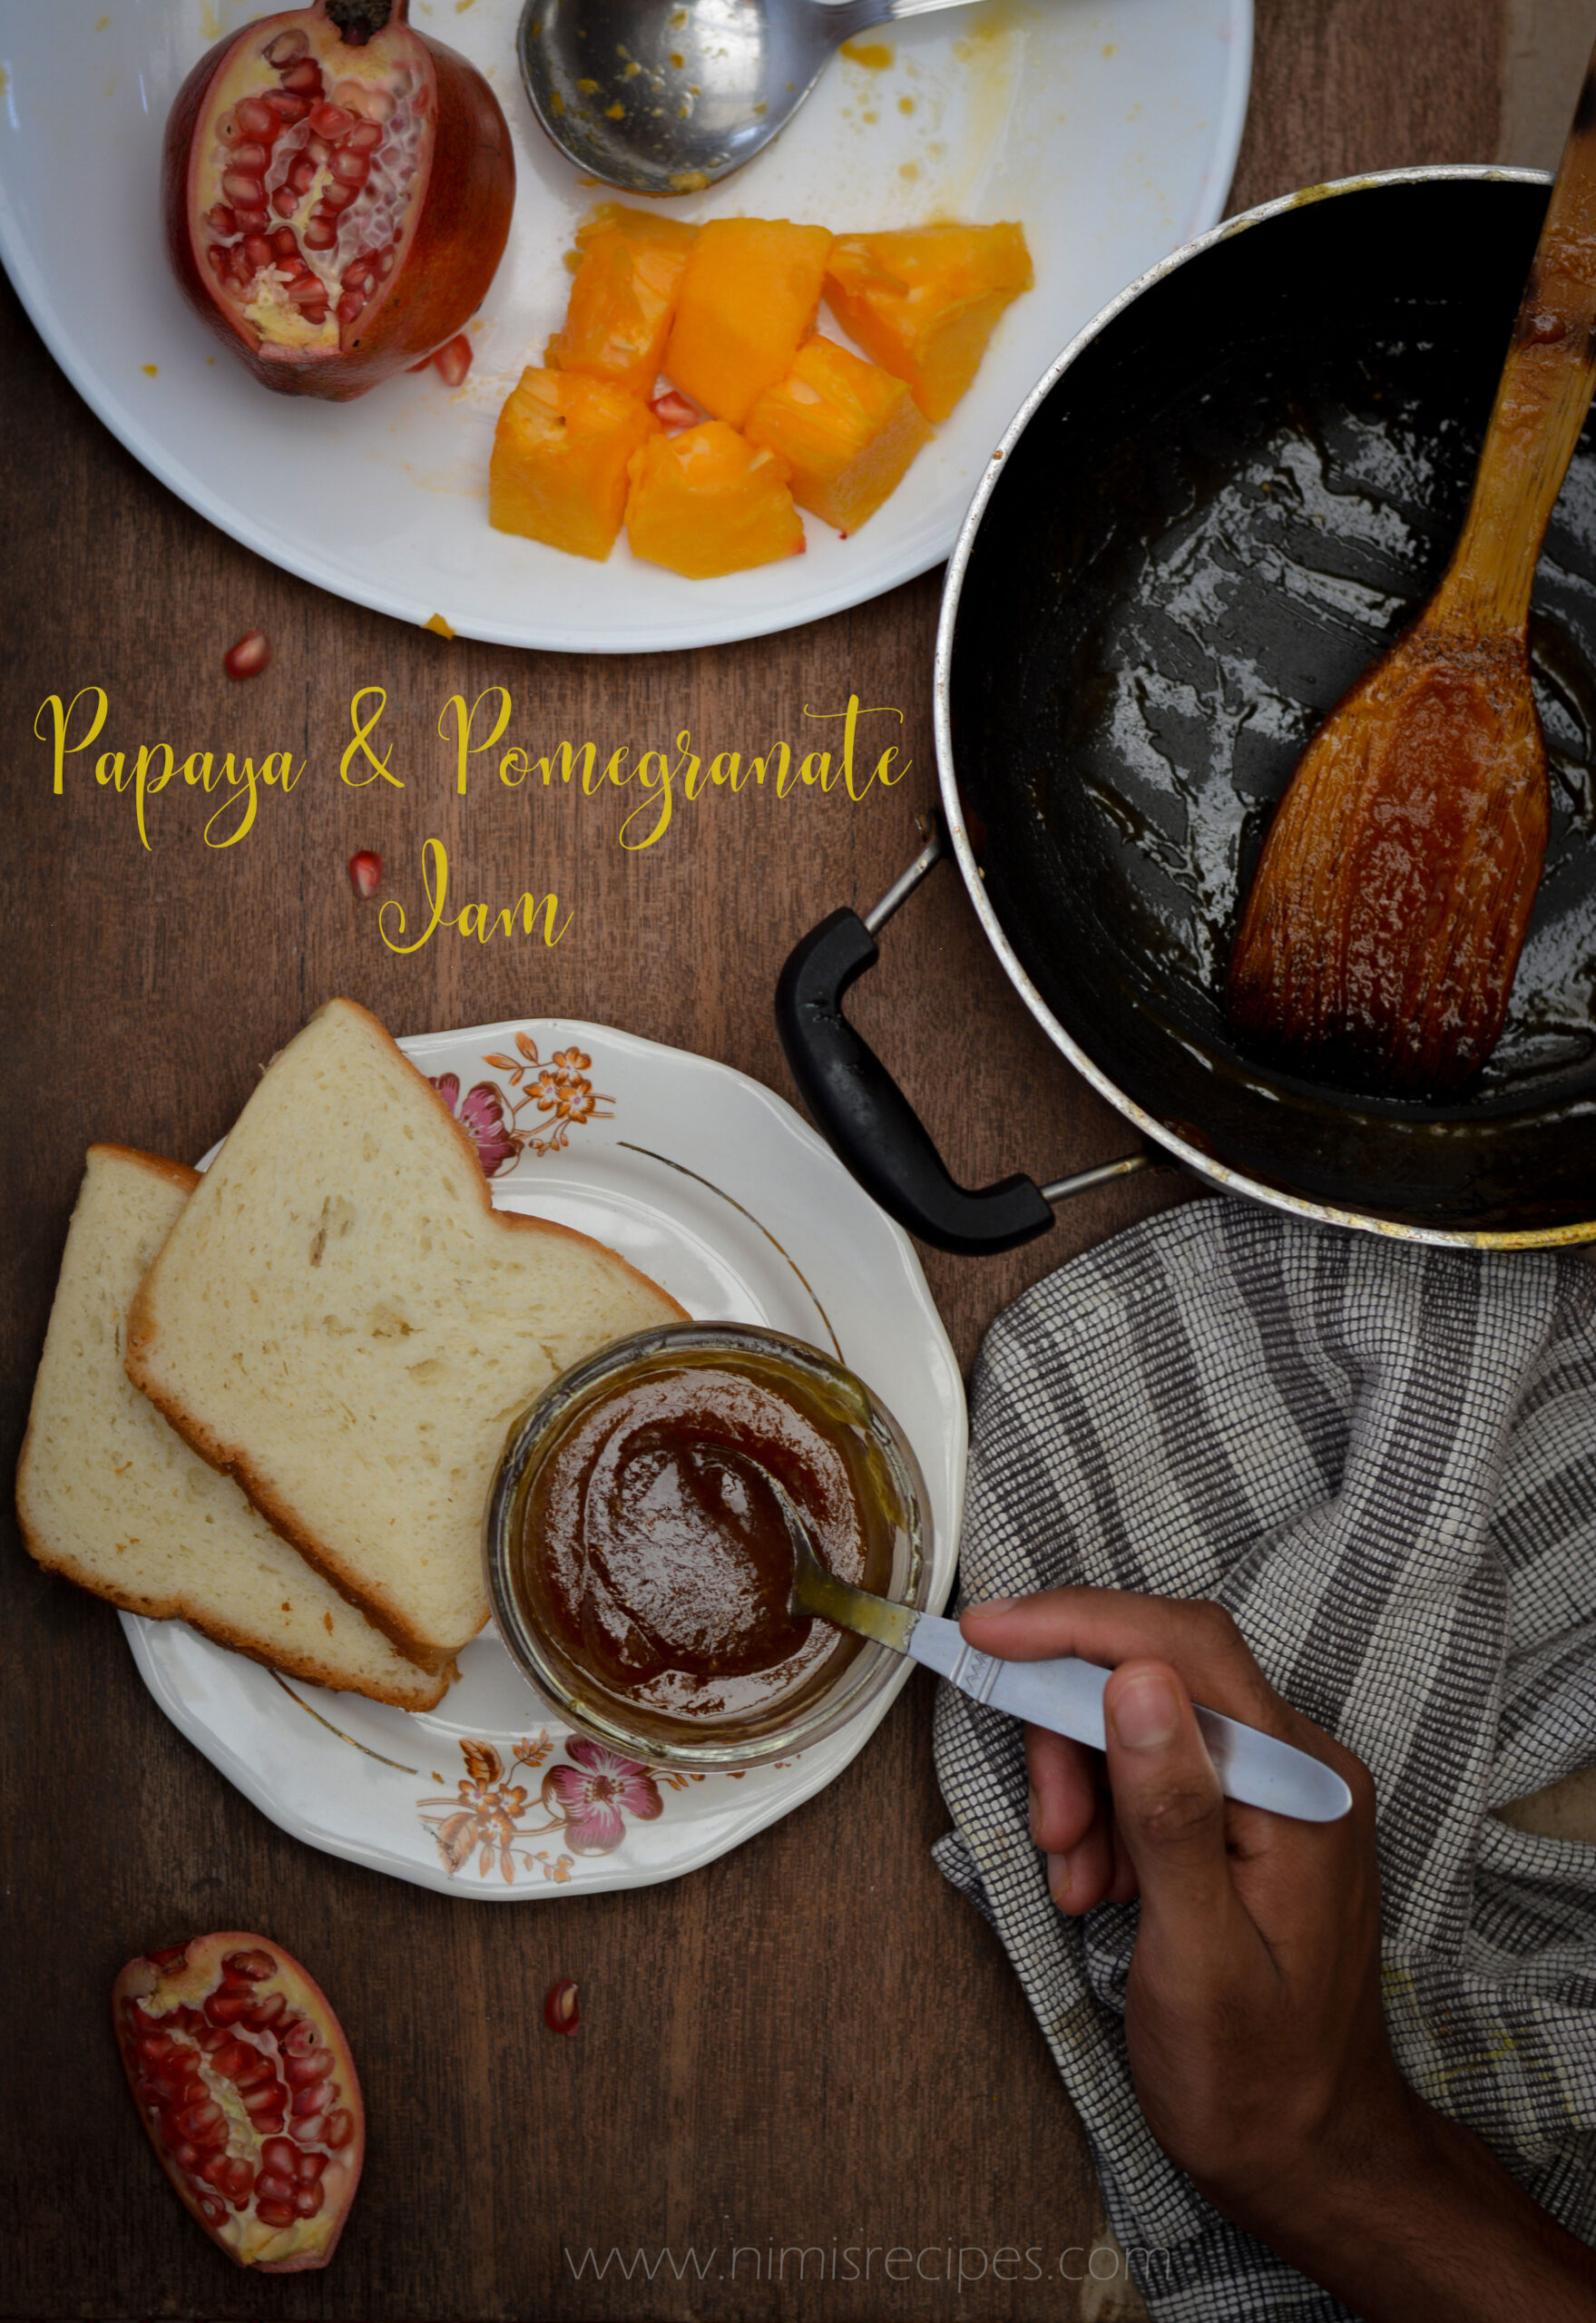
Making jams at home is such a satisfying feeling and I get to use the ripe leftover fruit in the fridge. A few weeks back, my mother-in-law had sent over huge papaya from our farm. I used it along with some pomegranates to make this papaya and pomegranate jam. My younger one is quite inclined on to mango jams that I make when fruits are in season. Jams are fairly easy to make at home and the best part is that they are preservative-free.
I recently made papaya and pomegranate jam and wanted to share details about my process for all of you who want to try making any kind of delicious fruit jam at home. Here in the recipe, I haven’t strained of the pomegranate seed bits as I wanted to have a bite in the jam that I was making.
When you’re making jam with traditional amounts of sugar, you should aim to cook it to 220°F. Here is a tip to check if your jam is ready or not: At the beginning of cooking, put two or three small plates or bowls in the freezer. As you begin to approach the end of cooking, pull one out, and put a small dollop of jam into the middle of the dish. Put it back into the freezer for two or three minutes (take your jam off the heat during this time)
When the time is up, pull the dish out of the freezer and gently nudge the dollop of jam with the tip of your finger. If it has formed a skin on top that wrinkles a bit when pushed, it is done. If it is still quite liquid and your finger runs right through it, it’s not done yet.
Papaya and Pomegranate Jam
2 and 3/4 cup of Papaya puree
3/4 cup of pomegranate puree ( don’t strain out the seeds)
3 cups of sugar (you can reduce the sugar to 2 and 3/4 cups too )
2 tbsp of lemon juice
Heat a pan with papaya puree and the pomegranate puree stirring continuously. Mix in sugar and keep mixing it by stirring . Add in the lemon juice . Continue stirring until you gain the right consistency.
Here is a tip to check if your jam is ready or not. Before you start cooking, put two or three small plates or bowls in the freezer. As you begin to approach the end of cooking, pull one out, and put a small dollop of jam into the middle of the dish. Put it back into the freezer for two or three minutes (take your jam off the heat during this time)
When the time is up, pull the dish out of the freezer and gently nudge the dollop of jam with the tip of your finger. If a skin forms on top that wrinkles a bit when pushed, it is done. If it is still quite liquid and your finger runs right through it, it’s not done yet. You can also try tilting the plate to check if it’s too runny.
Once it slightly cools down bottle it and enjoy 🙂
Making jams at home is such a satisfying feeling and I get to use the ripe leftover fruit in the fridge. Jams are fairly easy to make at home and the best part is that they are preservative-free. Check out this quick Papaya and pomegranate jam. You can find the detailed recipe on the below link ..https://nimisrecipes.com/2020/08/jamming-up-papaya-and-pomegranate/
Posted by Nimi Sunilkumar on Sunday, August 16, 2020
Instant dosa for Dosa lovers!
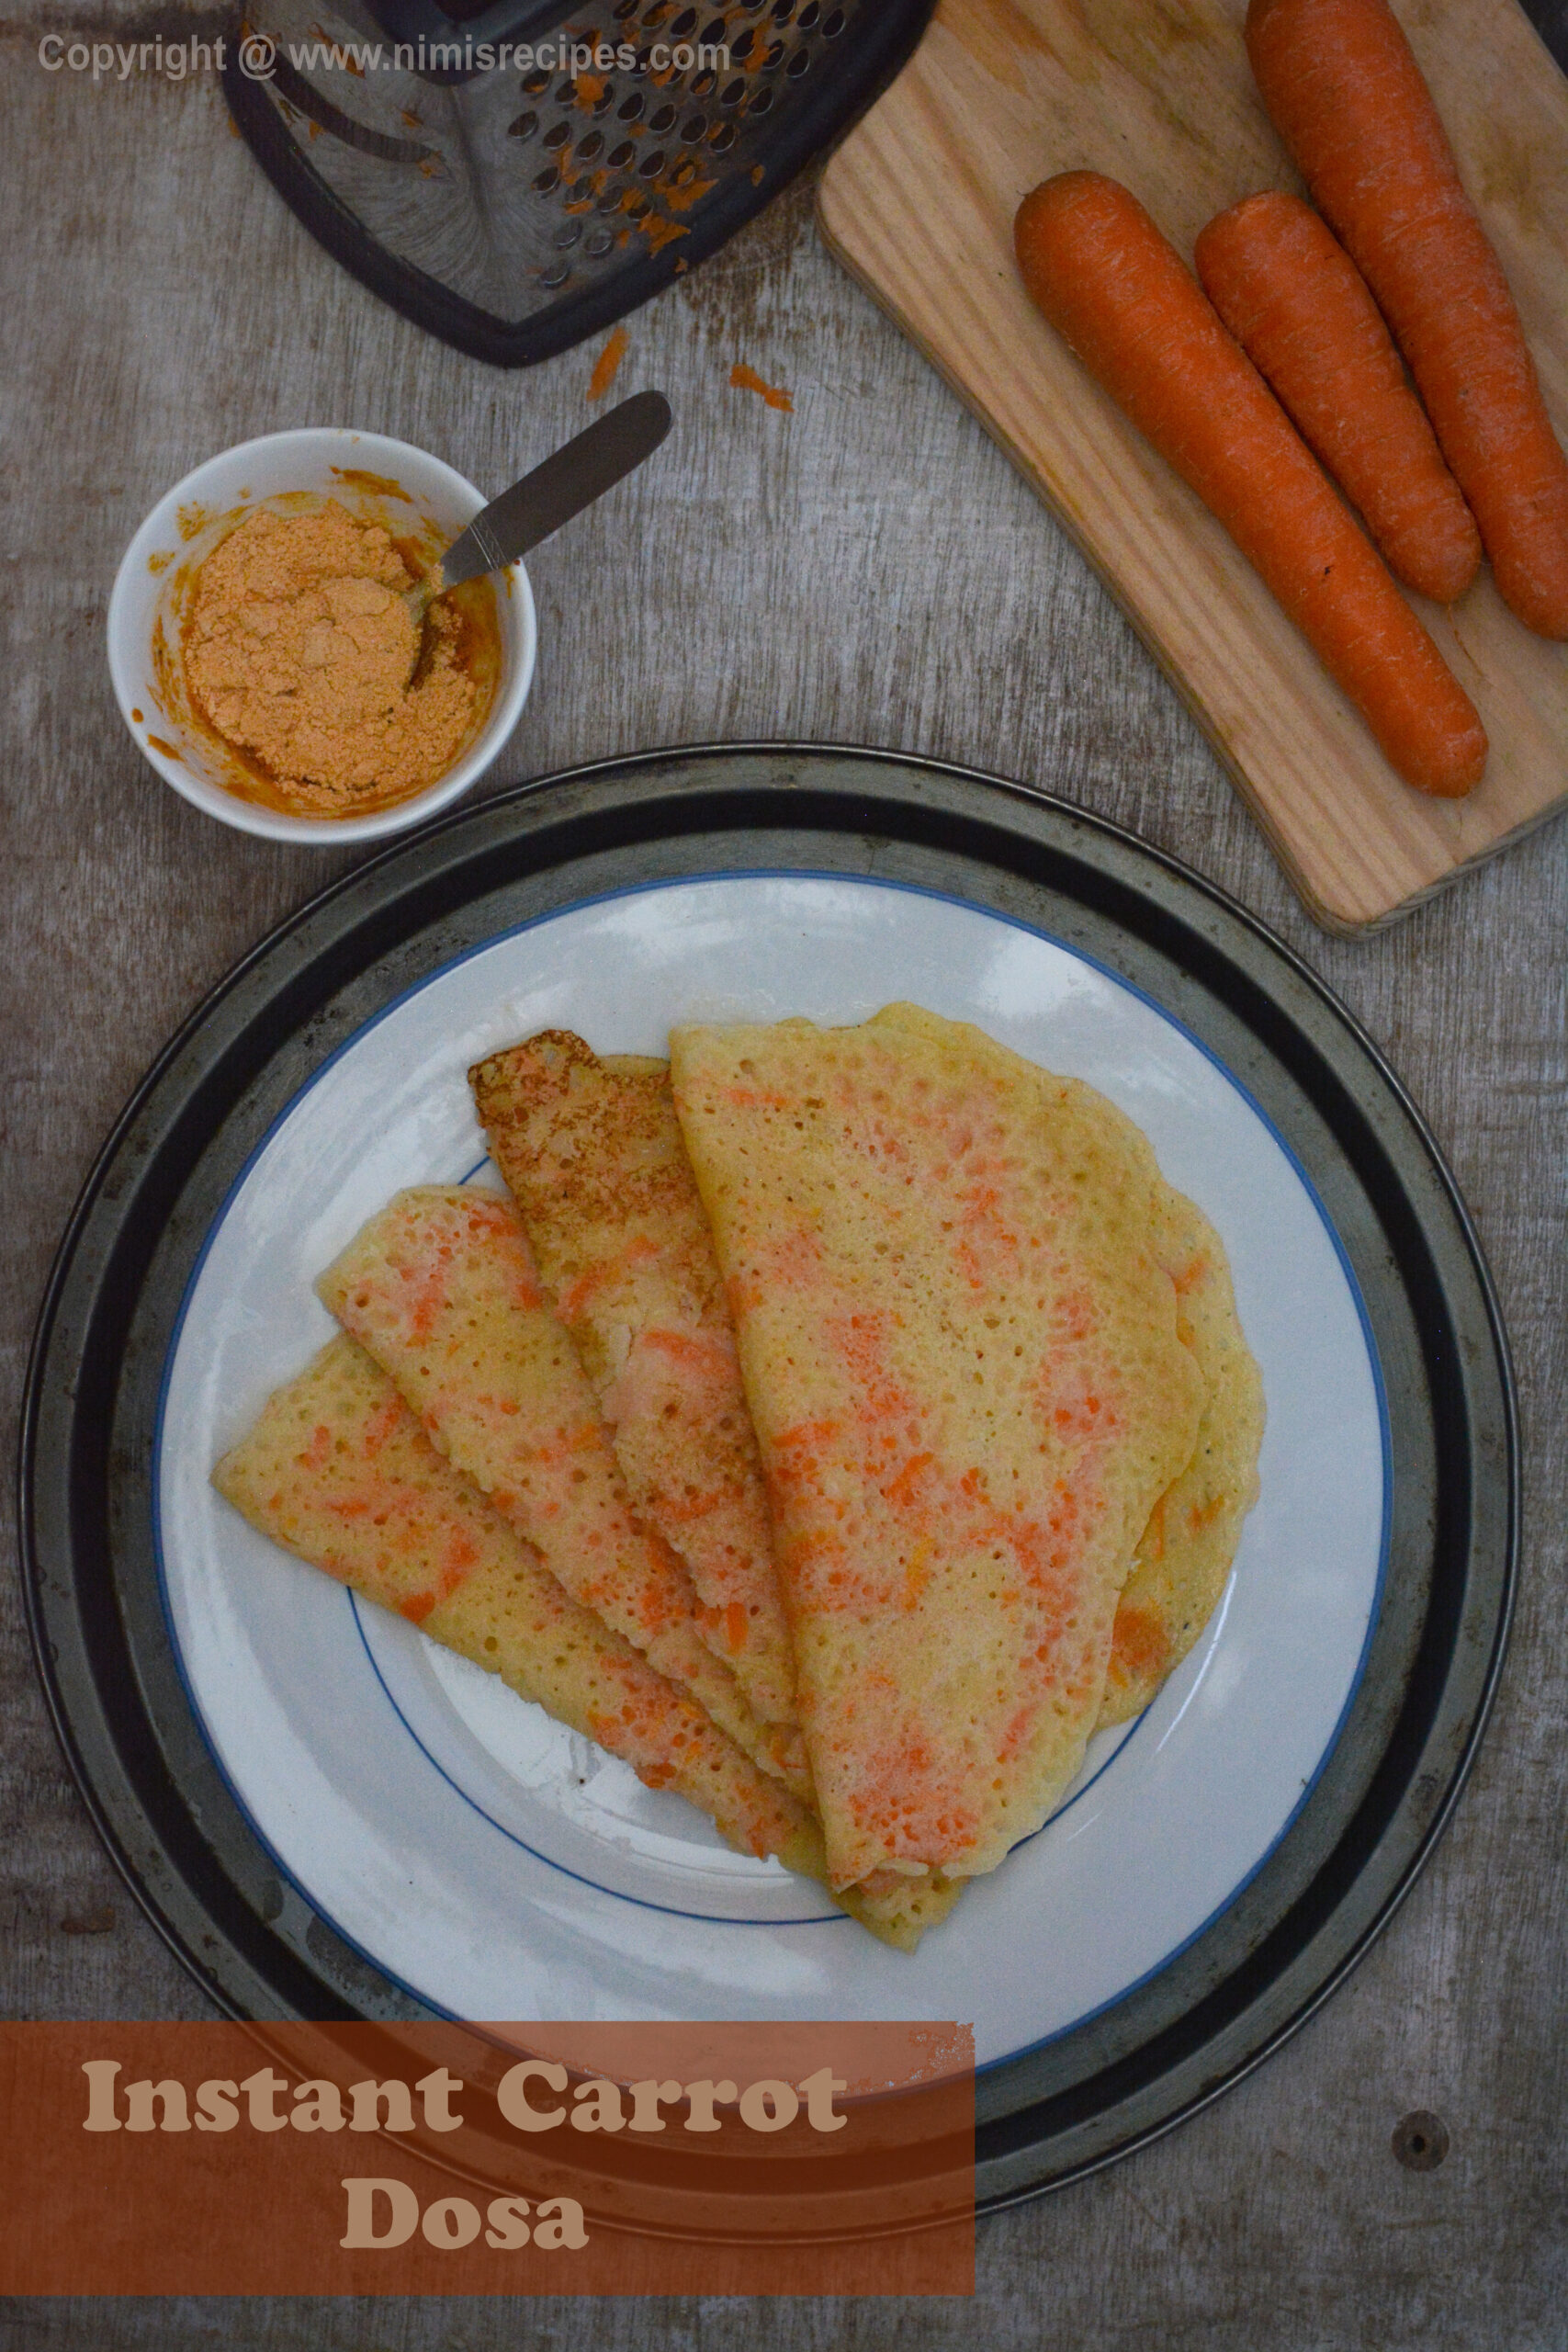
Some mornings can be lazy driven when you just want to schedule out the breakfast with a quick fix. Dosa being a popular South Indian crepe is mostly made with fermented rice and lentils. Today I am sharing a variation of our traditional dosa recipe. The Instant Carrot Dosa is an ideal way to start your day.
Looking for a fuss-free breakfast idea? The Instant Carrot Dosa is an ideal way to start your day. This dosa is colorful, healthy, and needs no overnight preparation. Made with carrots and rice, this dosa is delicious and will be a delight for your tastebuds.
Carrot Dosa
Ingredients:
1 cup of cooked rice
1 cup of raw rice
1 cup of grated carrots
3 tbsp of sugar
Half a cup of thick coconut milk
Half a cup of water
Salt to taste
Instructions:
Wash the rice and soak for 10 mins.
Add cooked rice and grind with water.
Let the mixture grind into a smooth paste.
Add grated carrots, sugar, coconut milk, and salt.
Mix all the ingredients well into a batter of pouring consistency.
Heat a Tawa and pour batter on it.
Cook dosas with ghee.
Serve hot with any chutney.
I relish this dosa with chutney podi mixed with sesame oil. You can also serve them with Sambar and coconut chutney. If you wish to learn to make the gunpowder chutney or chutney podi click below on the link .
Do try this at home and please leave your comments and suggestions in the comments section below.
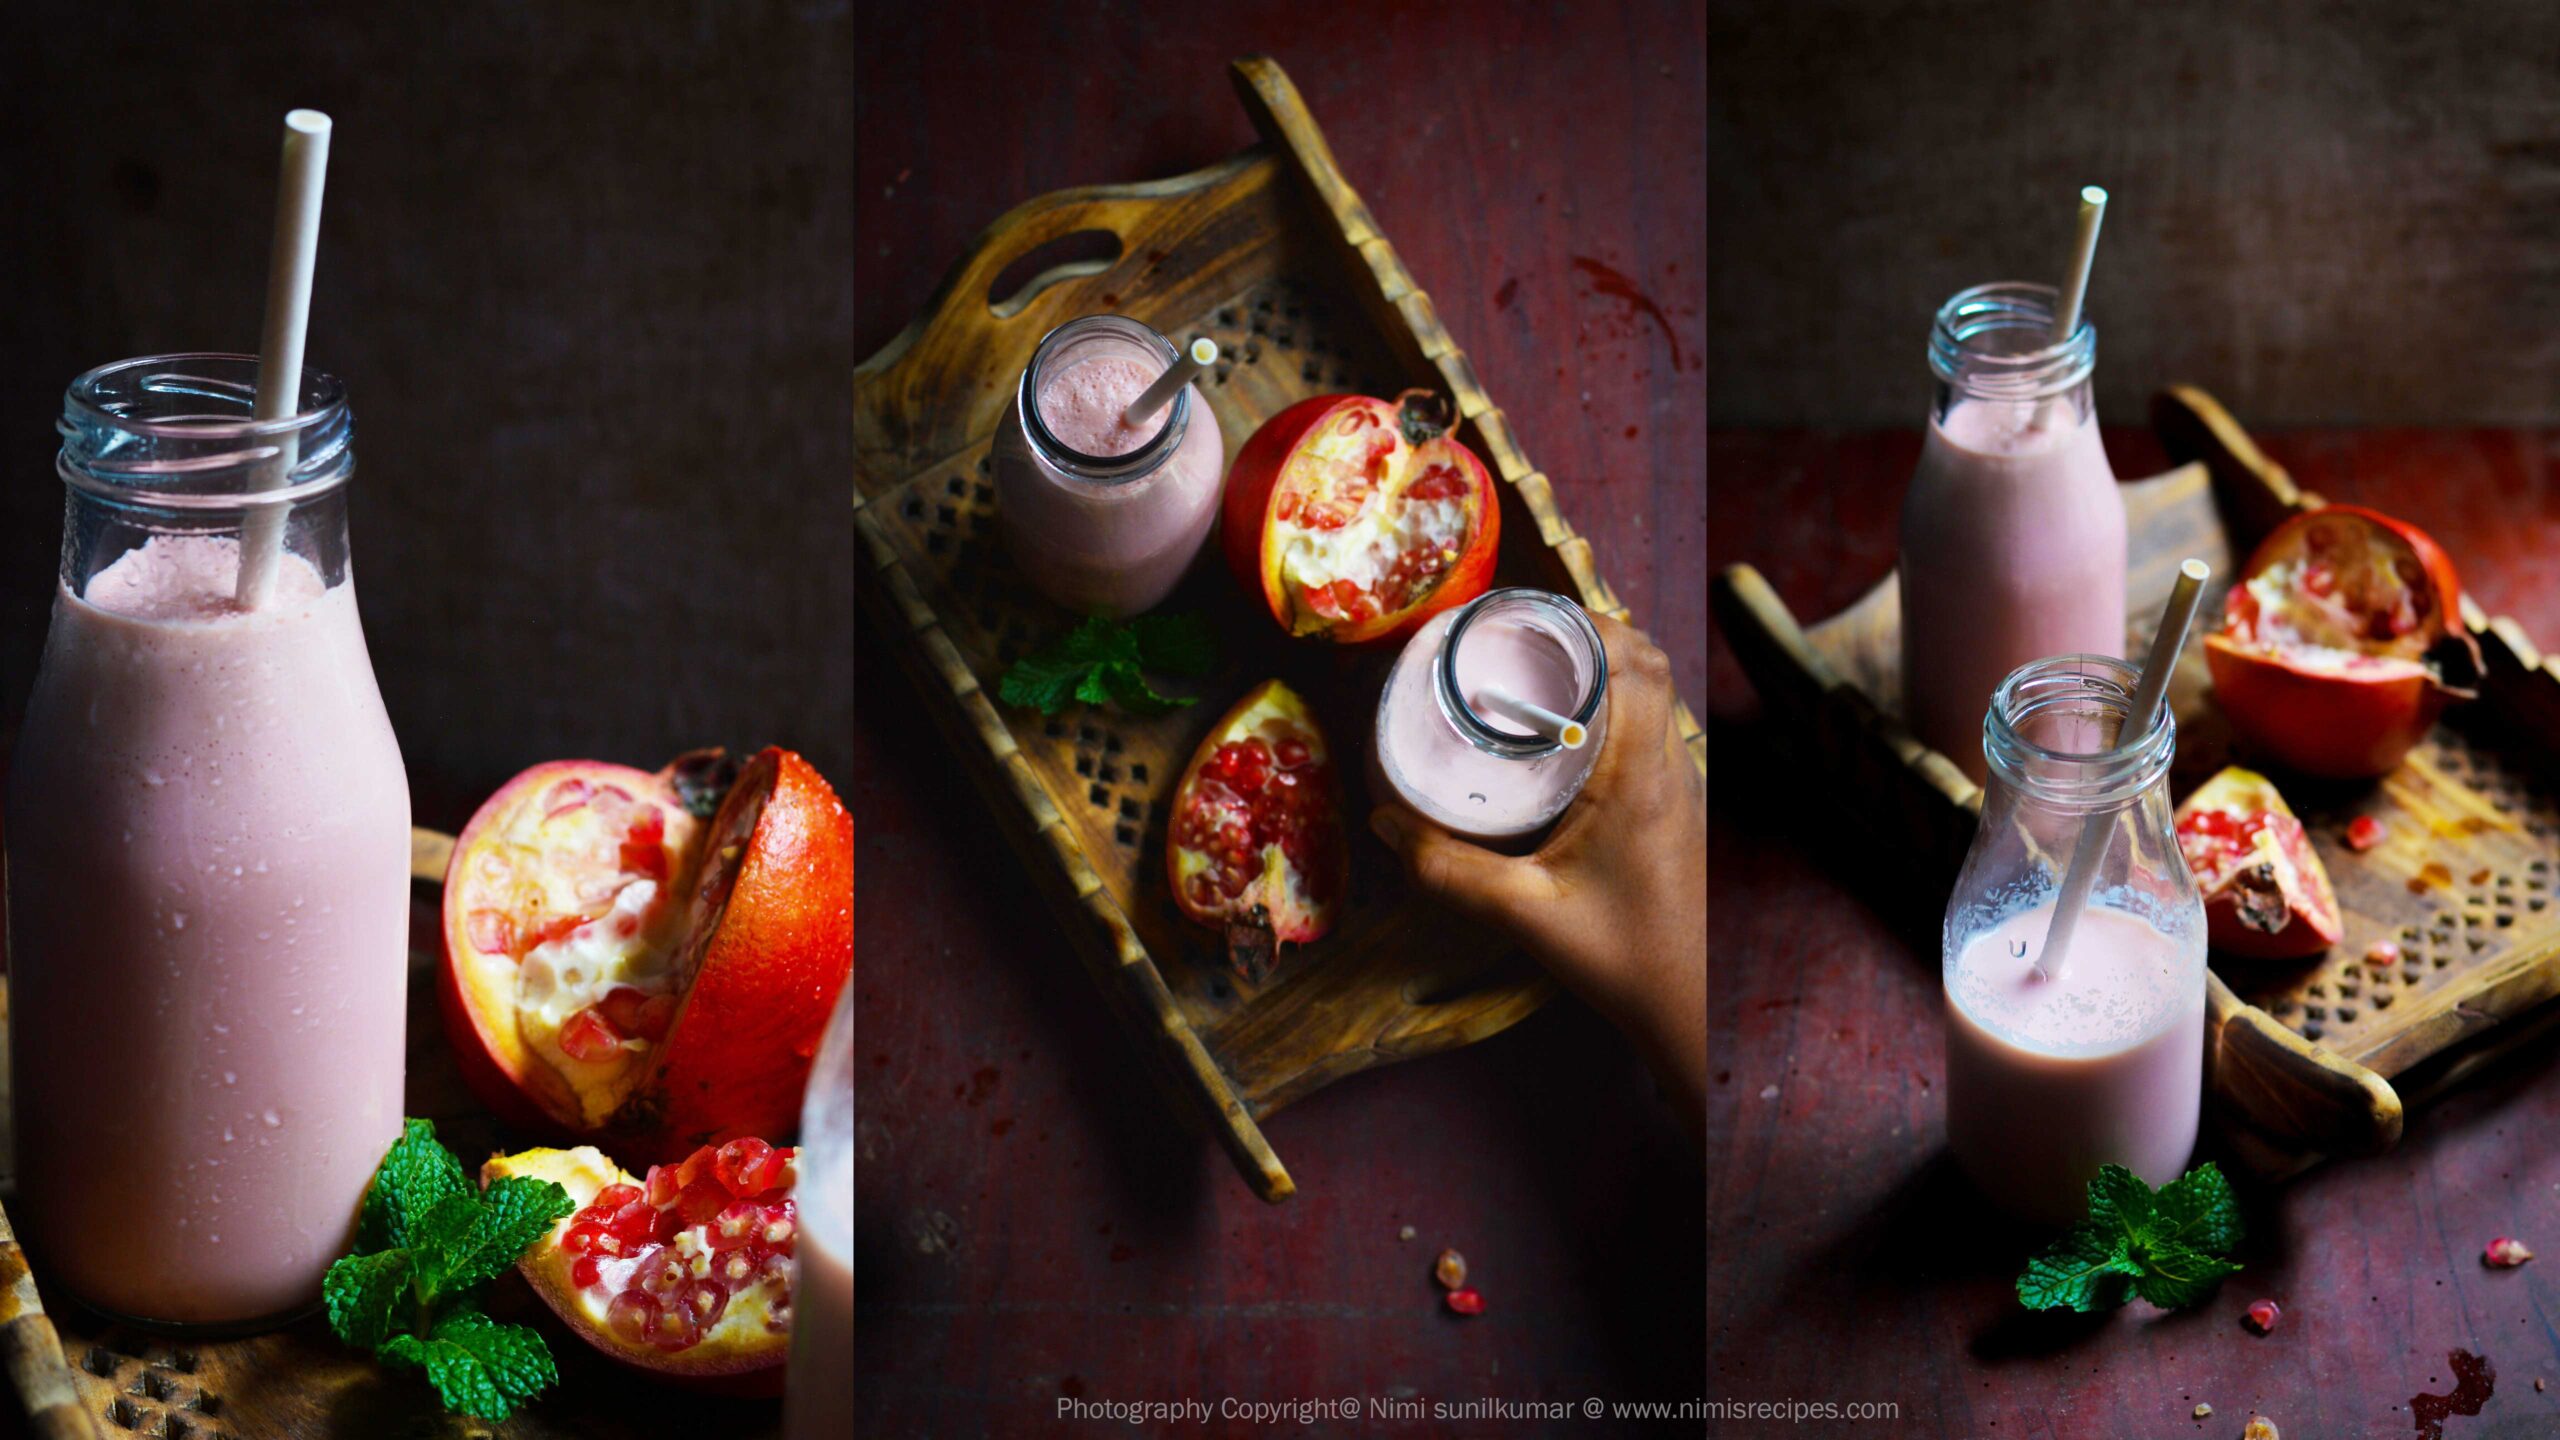
Pomegranate milkshake for #worldmilkday!
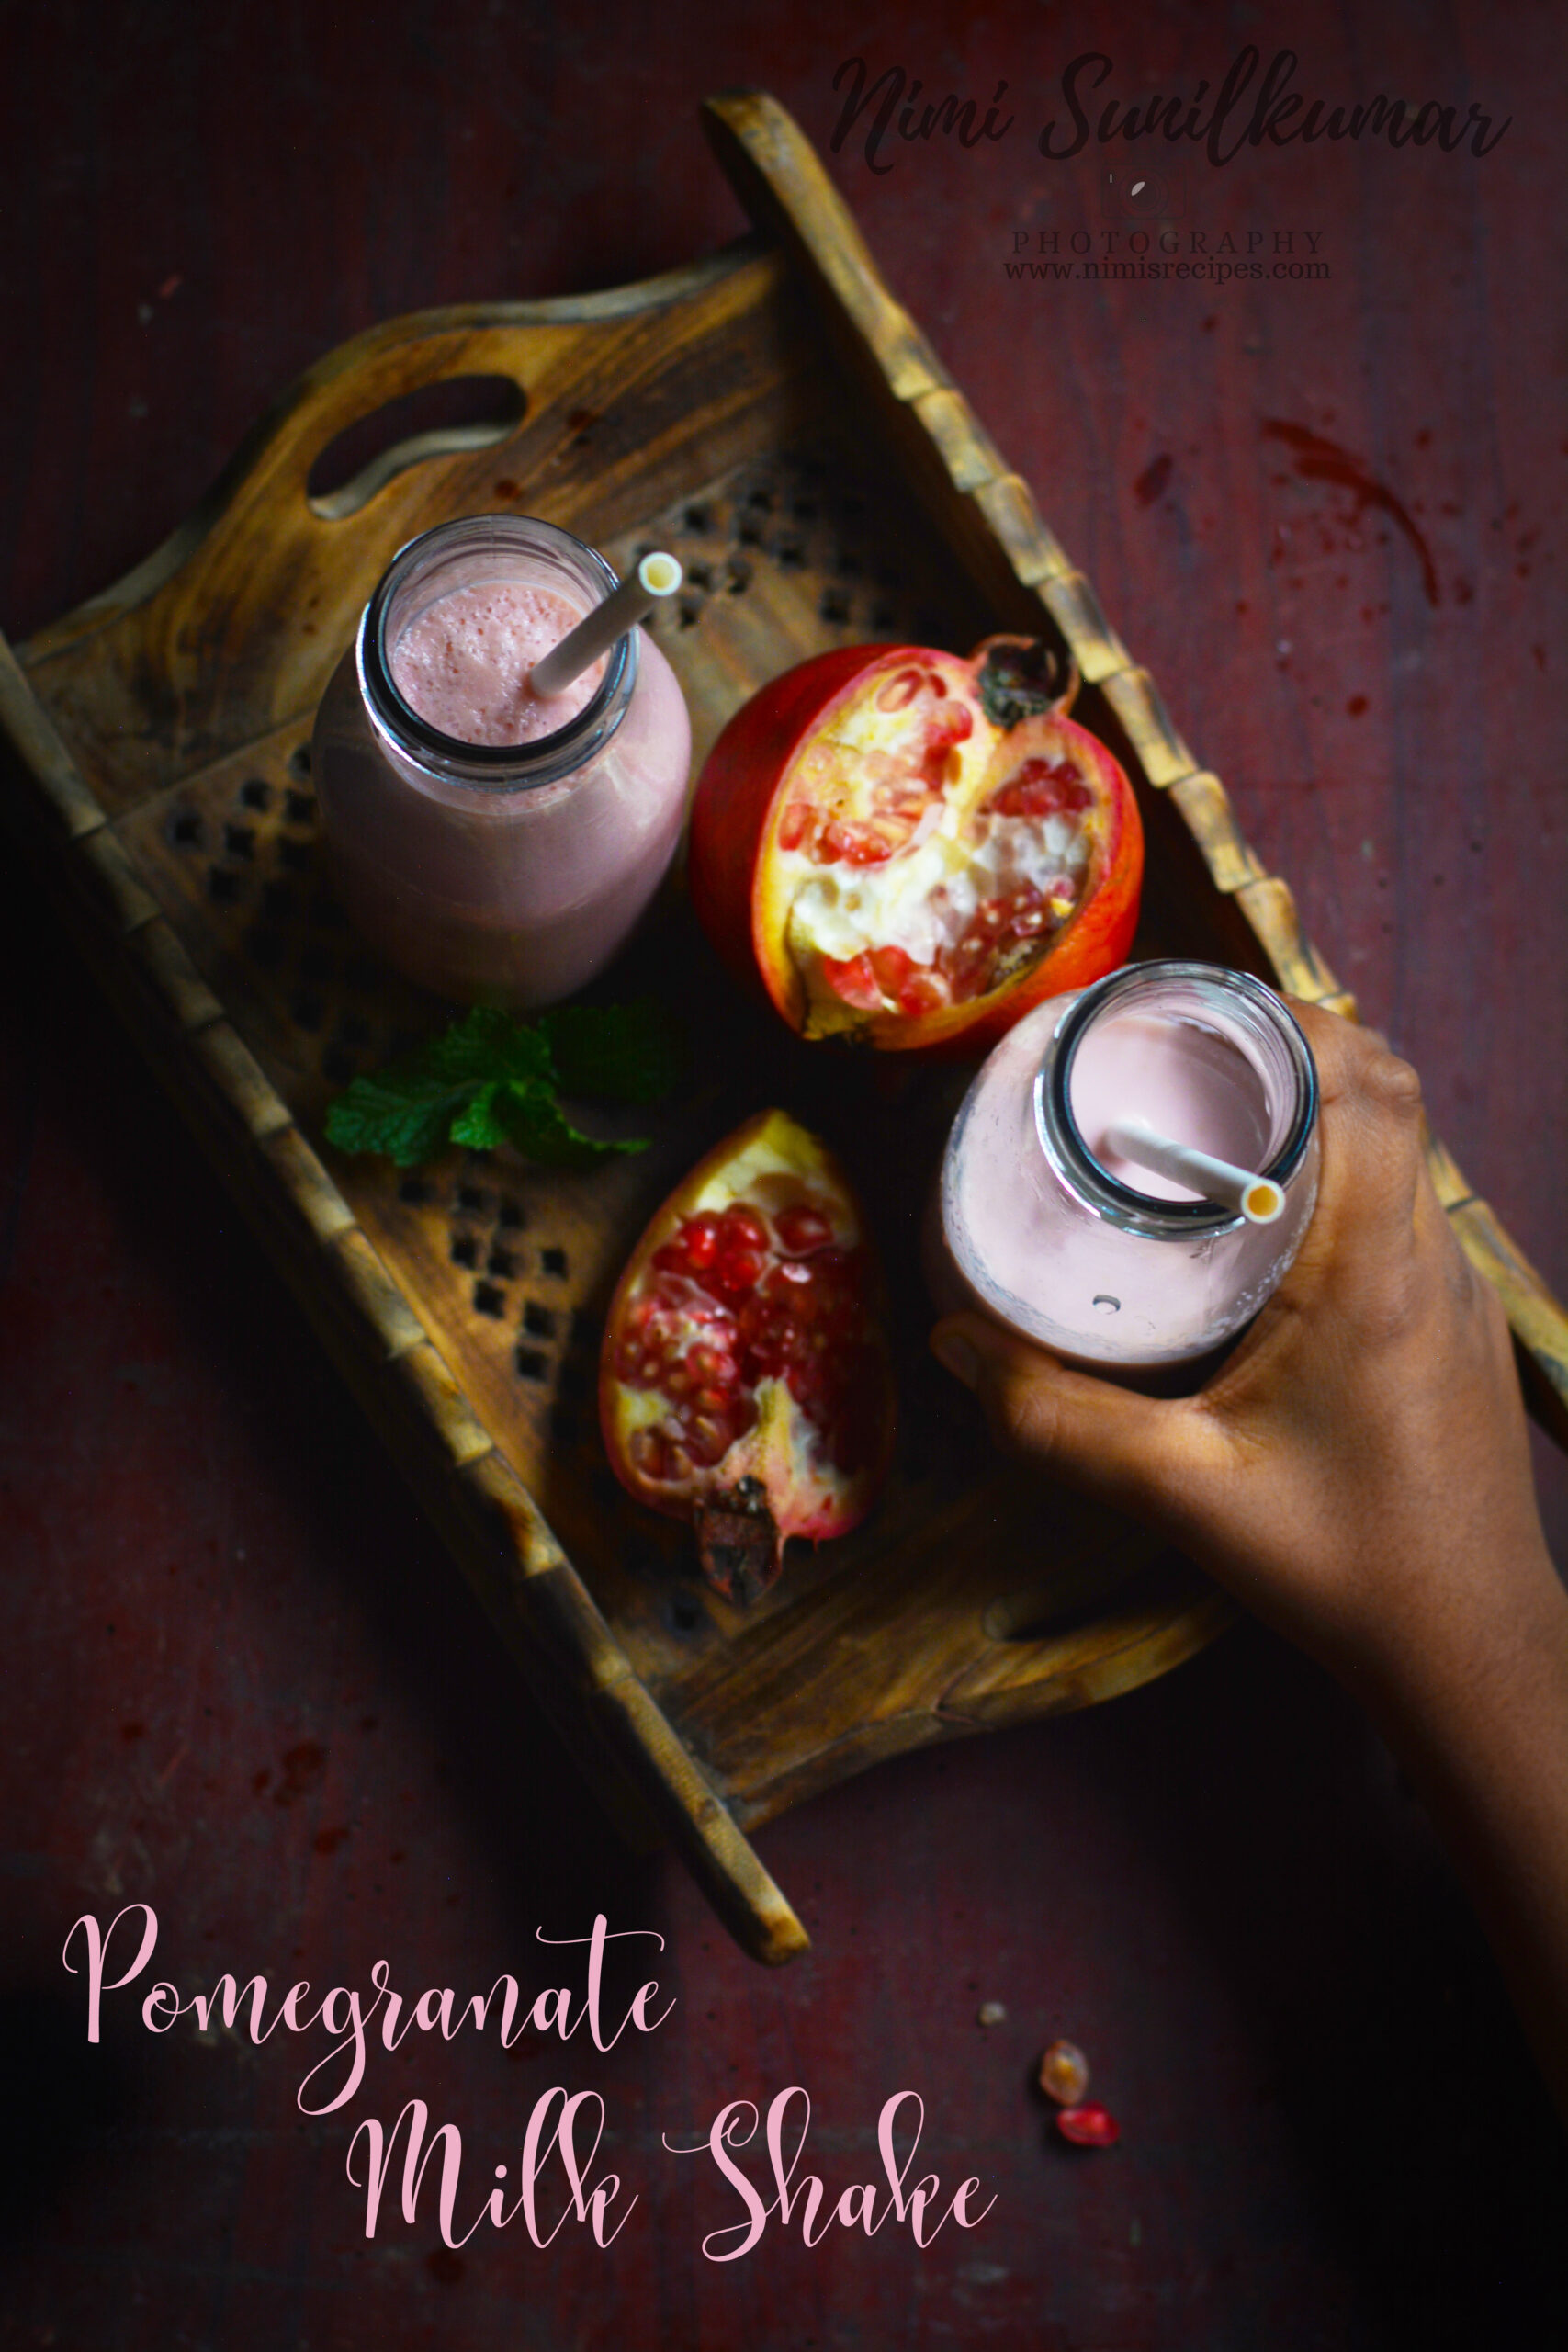
Have a yummy pomegranate milkshake on #worldmilkday today.
20 years ago, World Milk Day was established by the Food and Agriculture Organisation of the United Nations to recognize the importance of milk as a global food, and to celebrate the dairy sector. This fresh pomegranate milkshake is a must-have delight on a hot summer afternoon.
For the past couple of days, it had been pretty sunny and I was planning on using up the pomegranates. Having picky eaters for pomegranate at home this is what they would love having. Do try freezing the milkshakes into popsicles. They are super yum!
Pomegranate Milkshake
Ingredients:
2 medium-sized Pomegranates (deseeded)
2 cups of chilled milk
1/4 cup of sugar (can use honey as well )
2 mint leaves (optional)
Instructions:
Deseed the pomegranate and put it in the mixer.
Add sugar and some chilled milk.
Blend for a few minutes. Add in mint leaves (Make sure you don’t overdo the mint flavor.)
Pour the remaining milk and mix well.
Strain the milkshake and discard the seeds and pour it into serving glasses.
Badam Kheer to celebrate Eid!
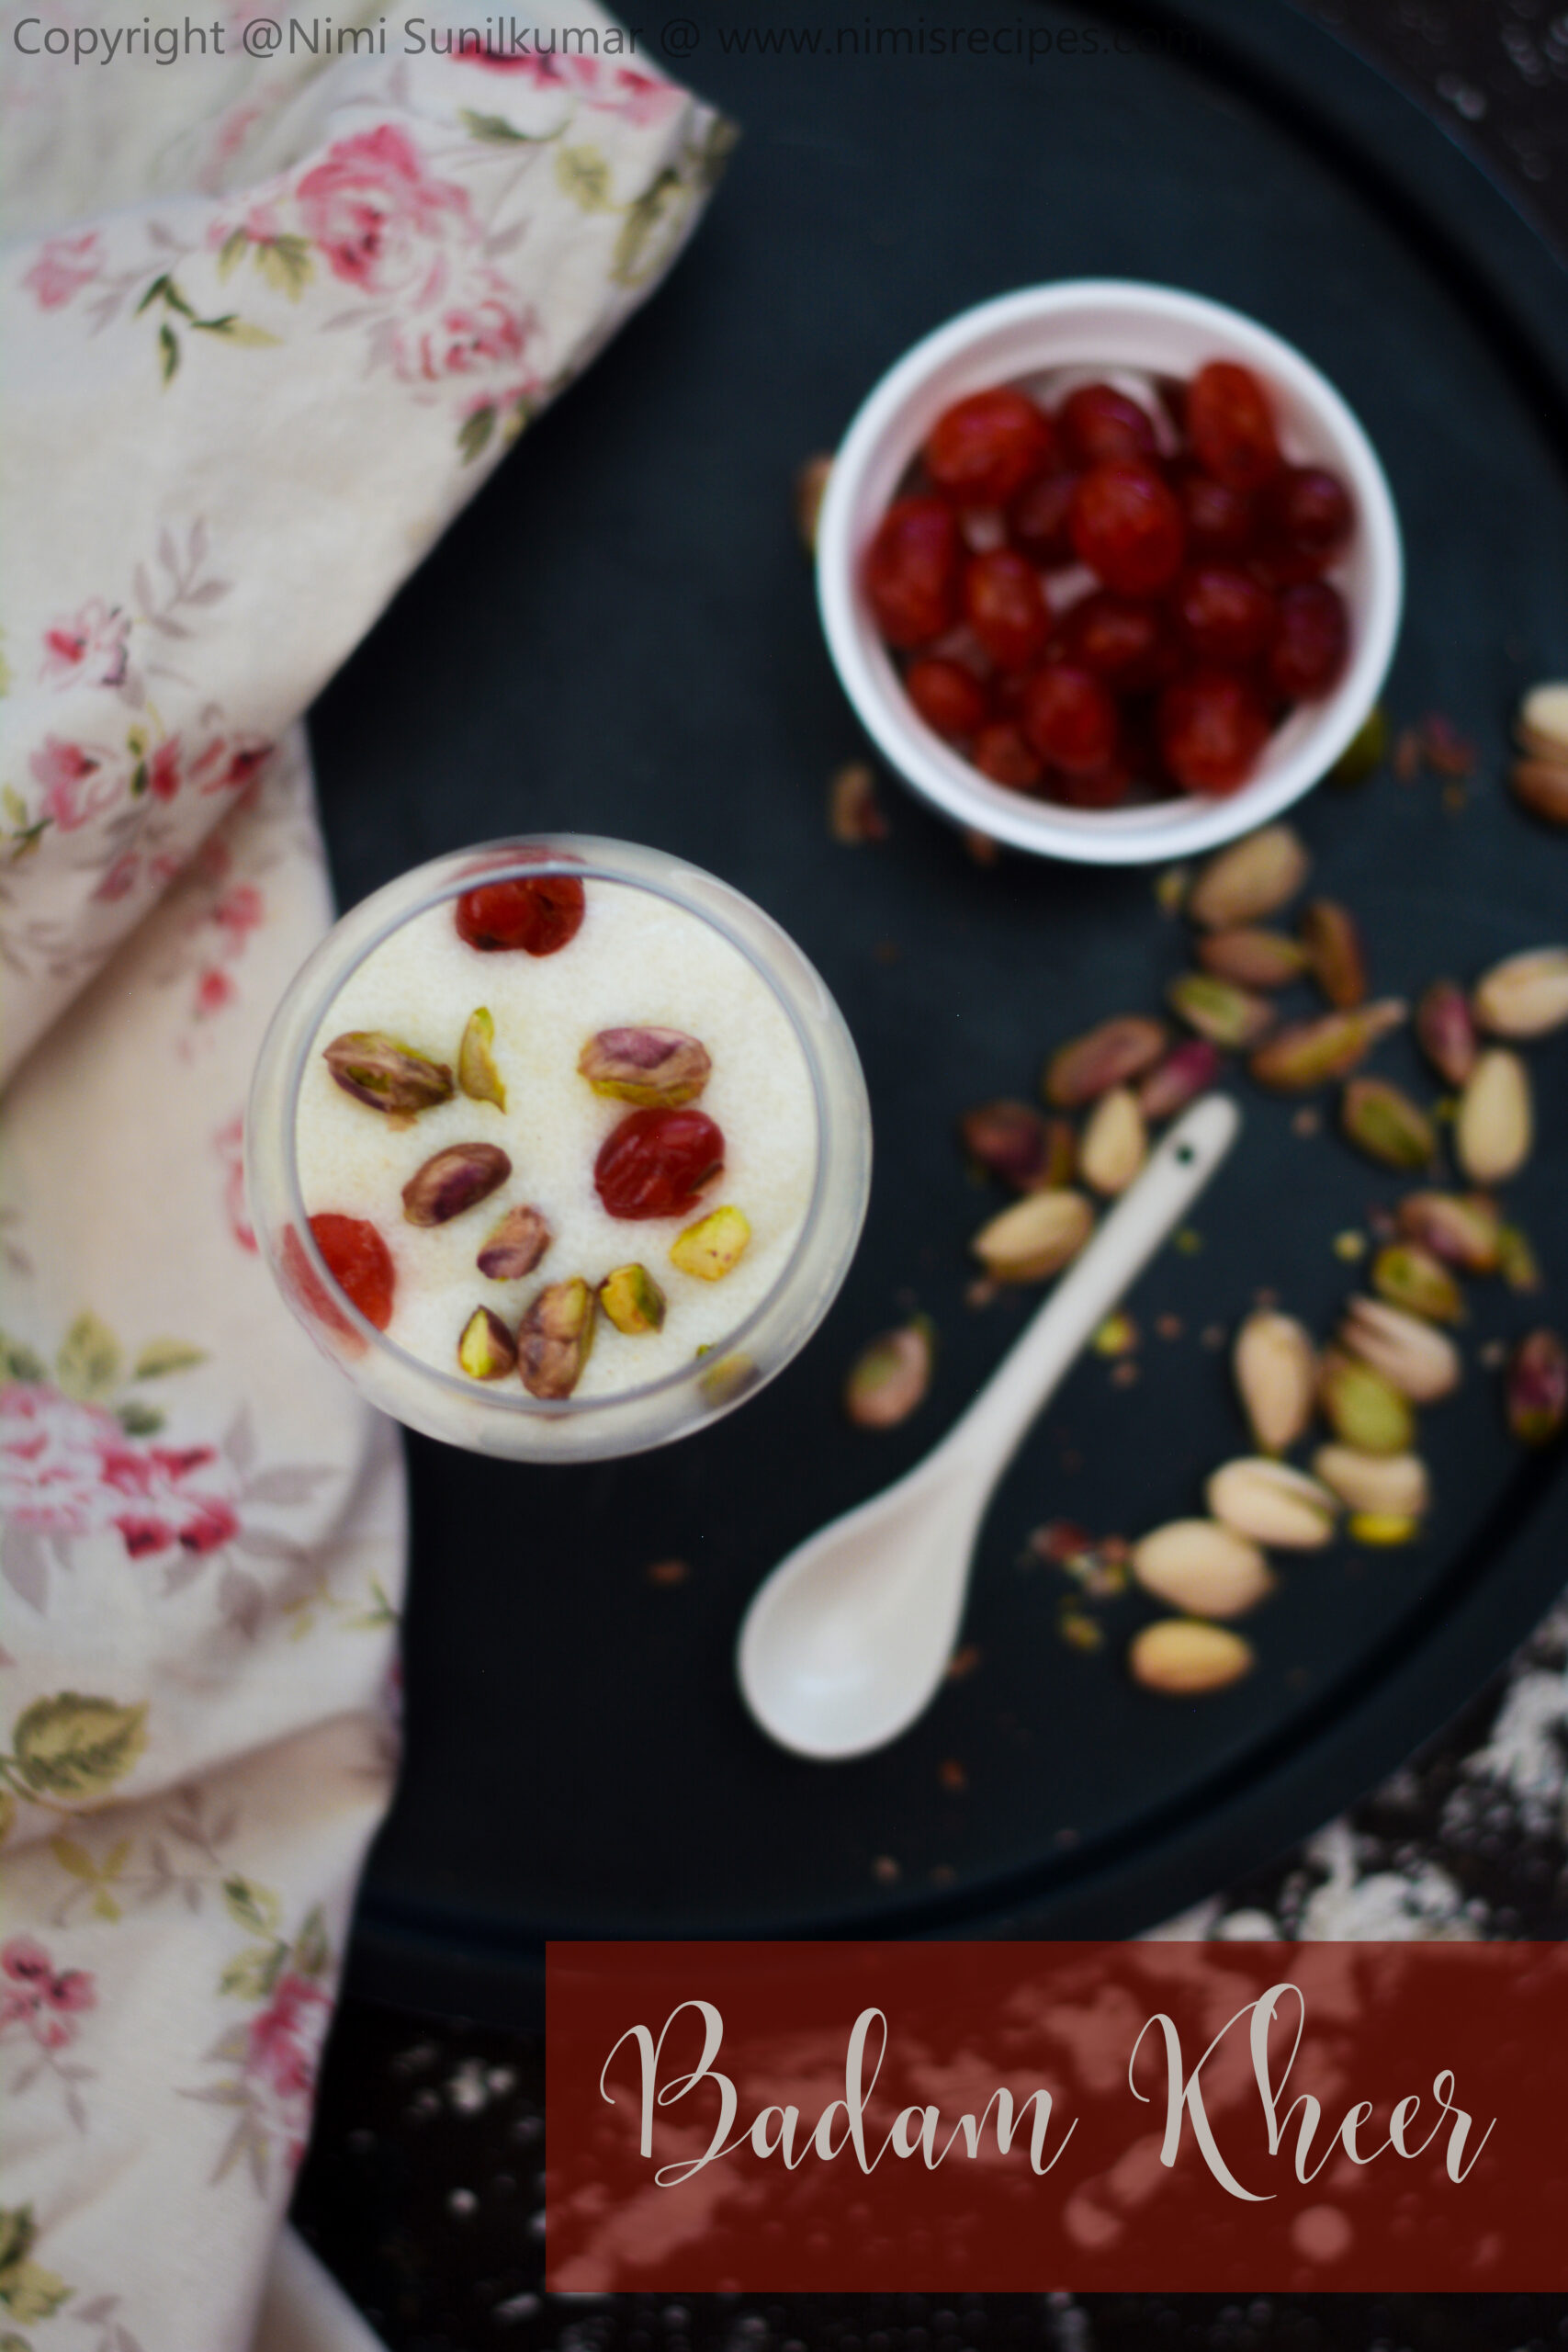
In this phase 4 of the lockdown that we are undergoing, hoping that all are safe at home. Be it any festivity ..there’s always a special craving for a dessert. Add a nutty sweetness to your Eid festivities tomorrow with this delicious badam kheer. A rich delicacy like this is a perfect way to celebrate the end of Ramzan. It is very healthy and extremely easy to make.
Follow this step-by-step recipe to enjoy badam kheer this Eid-ul-Fitr.
Badam Kheer
Ingredients:
6 tbsp of semolina
100 gm of sugar
700 ml of milk
20 gm of badam
6 pistas (chopped)
4 cherries (chopped)
Instructions:
Boil and peel the almonds.
Grind them into a paste.
Boil milk and sugar in a pan on low flame.
Add semolina and stir well.
Pour the badam paste into the mixture and stir.
Once the mixture thickens, remove it from the stove.
Pour the kheer halfway into a glass.
Add a layer of chopped pistas.
Now, fill up the rest of the glass with kheer.
Garnish with chopped badam, pistas, and cherries.
Serve warm 🙂

Chutney podi for Dosa & Idli lovers!
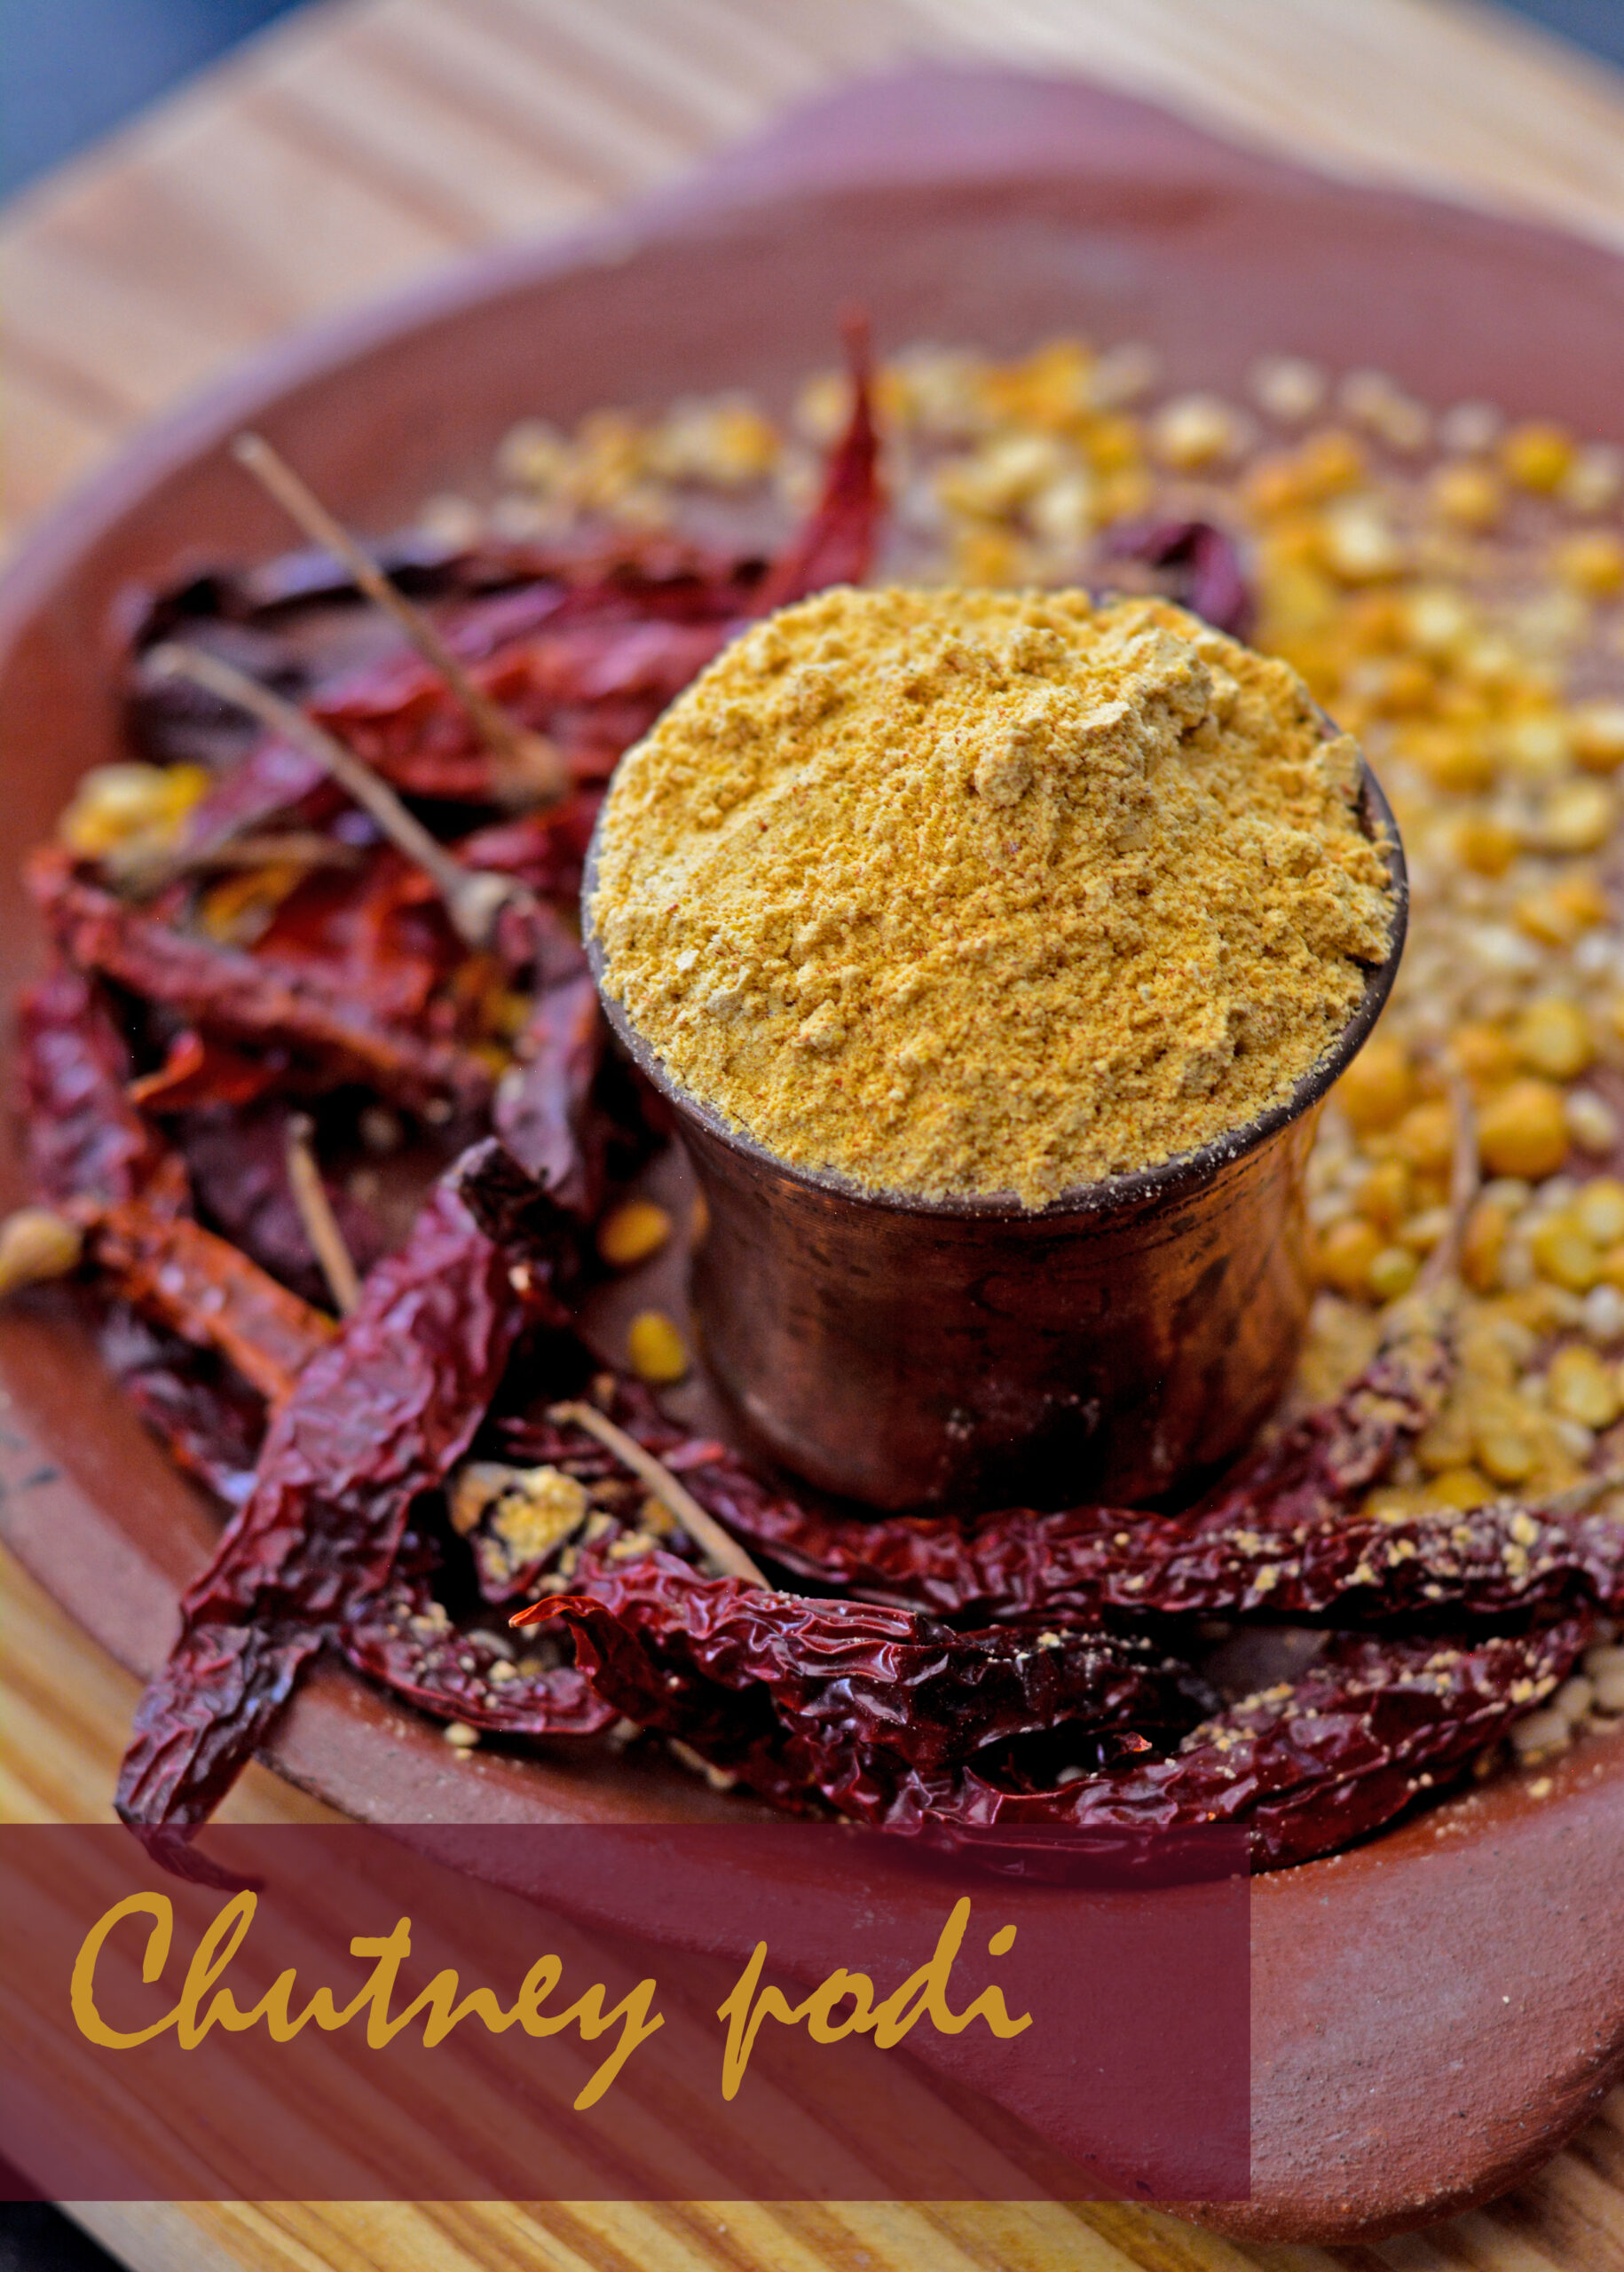
Chutney Podi is known by many names-gun powder, idli podi and pappula podi. This dry powder is a staple in South Indian homes and is not only easy to make but also filled with protein, fiber, essential vitamins, and minerals. This is something that you can always store in cupboards in batches in airtight containers.
This versatile chutney podi can be enjoyed with idlis, dosas, hot rice, chapati or even parathas. In this simple video, I teach you to step by step, how to make this delicious powder at home. Do try this recipe at home and share your videos and pictures with me on Instagram(@nimisrecipes). In case of any queries or doubts, DM me, I would love to help you.
Chutney Podi
Ingredients:
1 TSP of oil
2 cups of chickpea lentils
1 cup of black gram lentils (without skin)
1/2 cup of curry leaves
10 Kashmiri dry chillies
2 TSP of asafoetida powder
1 & 1/2 TSP of salt
Heat oil in a pan .Toast chickpea lentils and black gram lentils.
Put in the curry leaves and mix well.
As the lentils start changing color, add the Kashmiri dry chilies.
Once the lentils start turning golden, add the asafoetida powder and stir well.
Blend all the ingredients until you have a coarse mixture.
Lastly, add salt to taste. Store in airtight containers. When serving , mix the chutney podi with oil(sesame or coconut oil) to make it into a paste and serve with dosas or idlis.
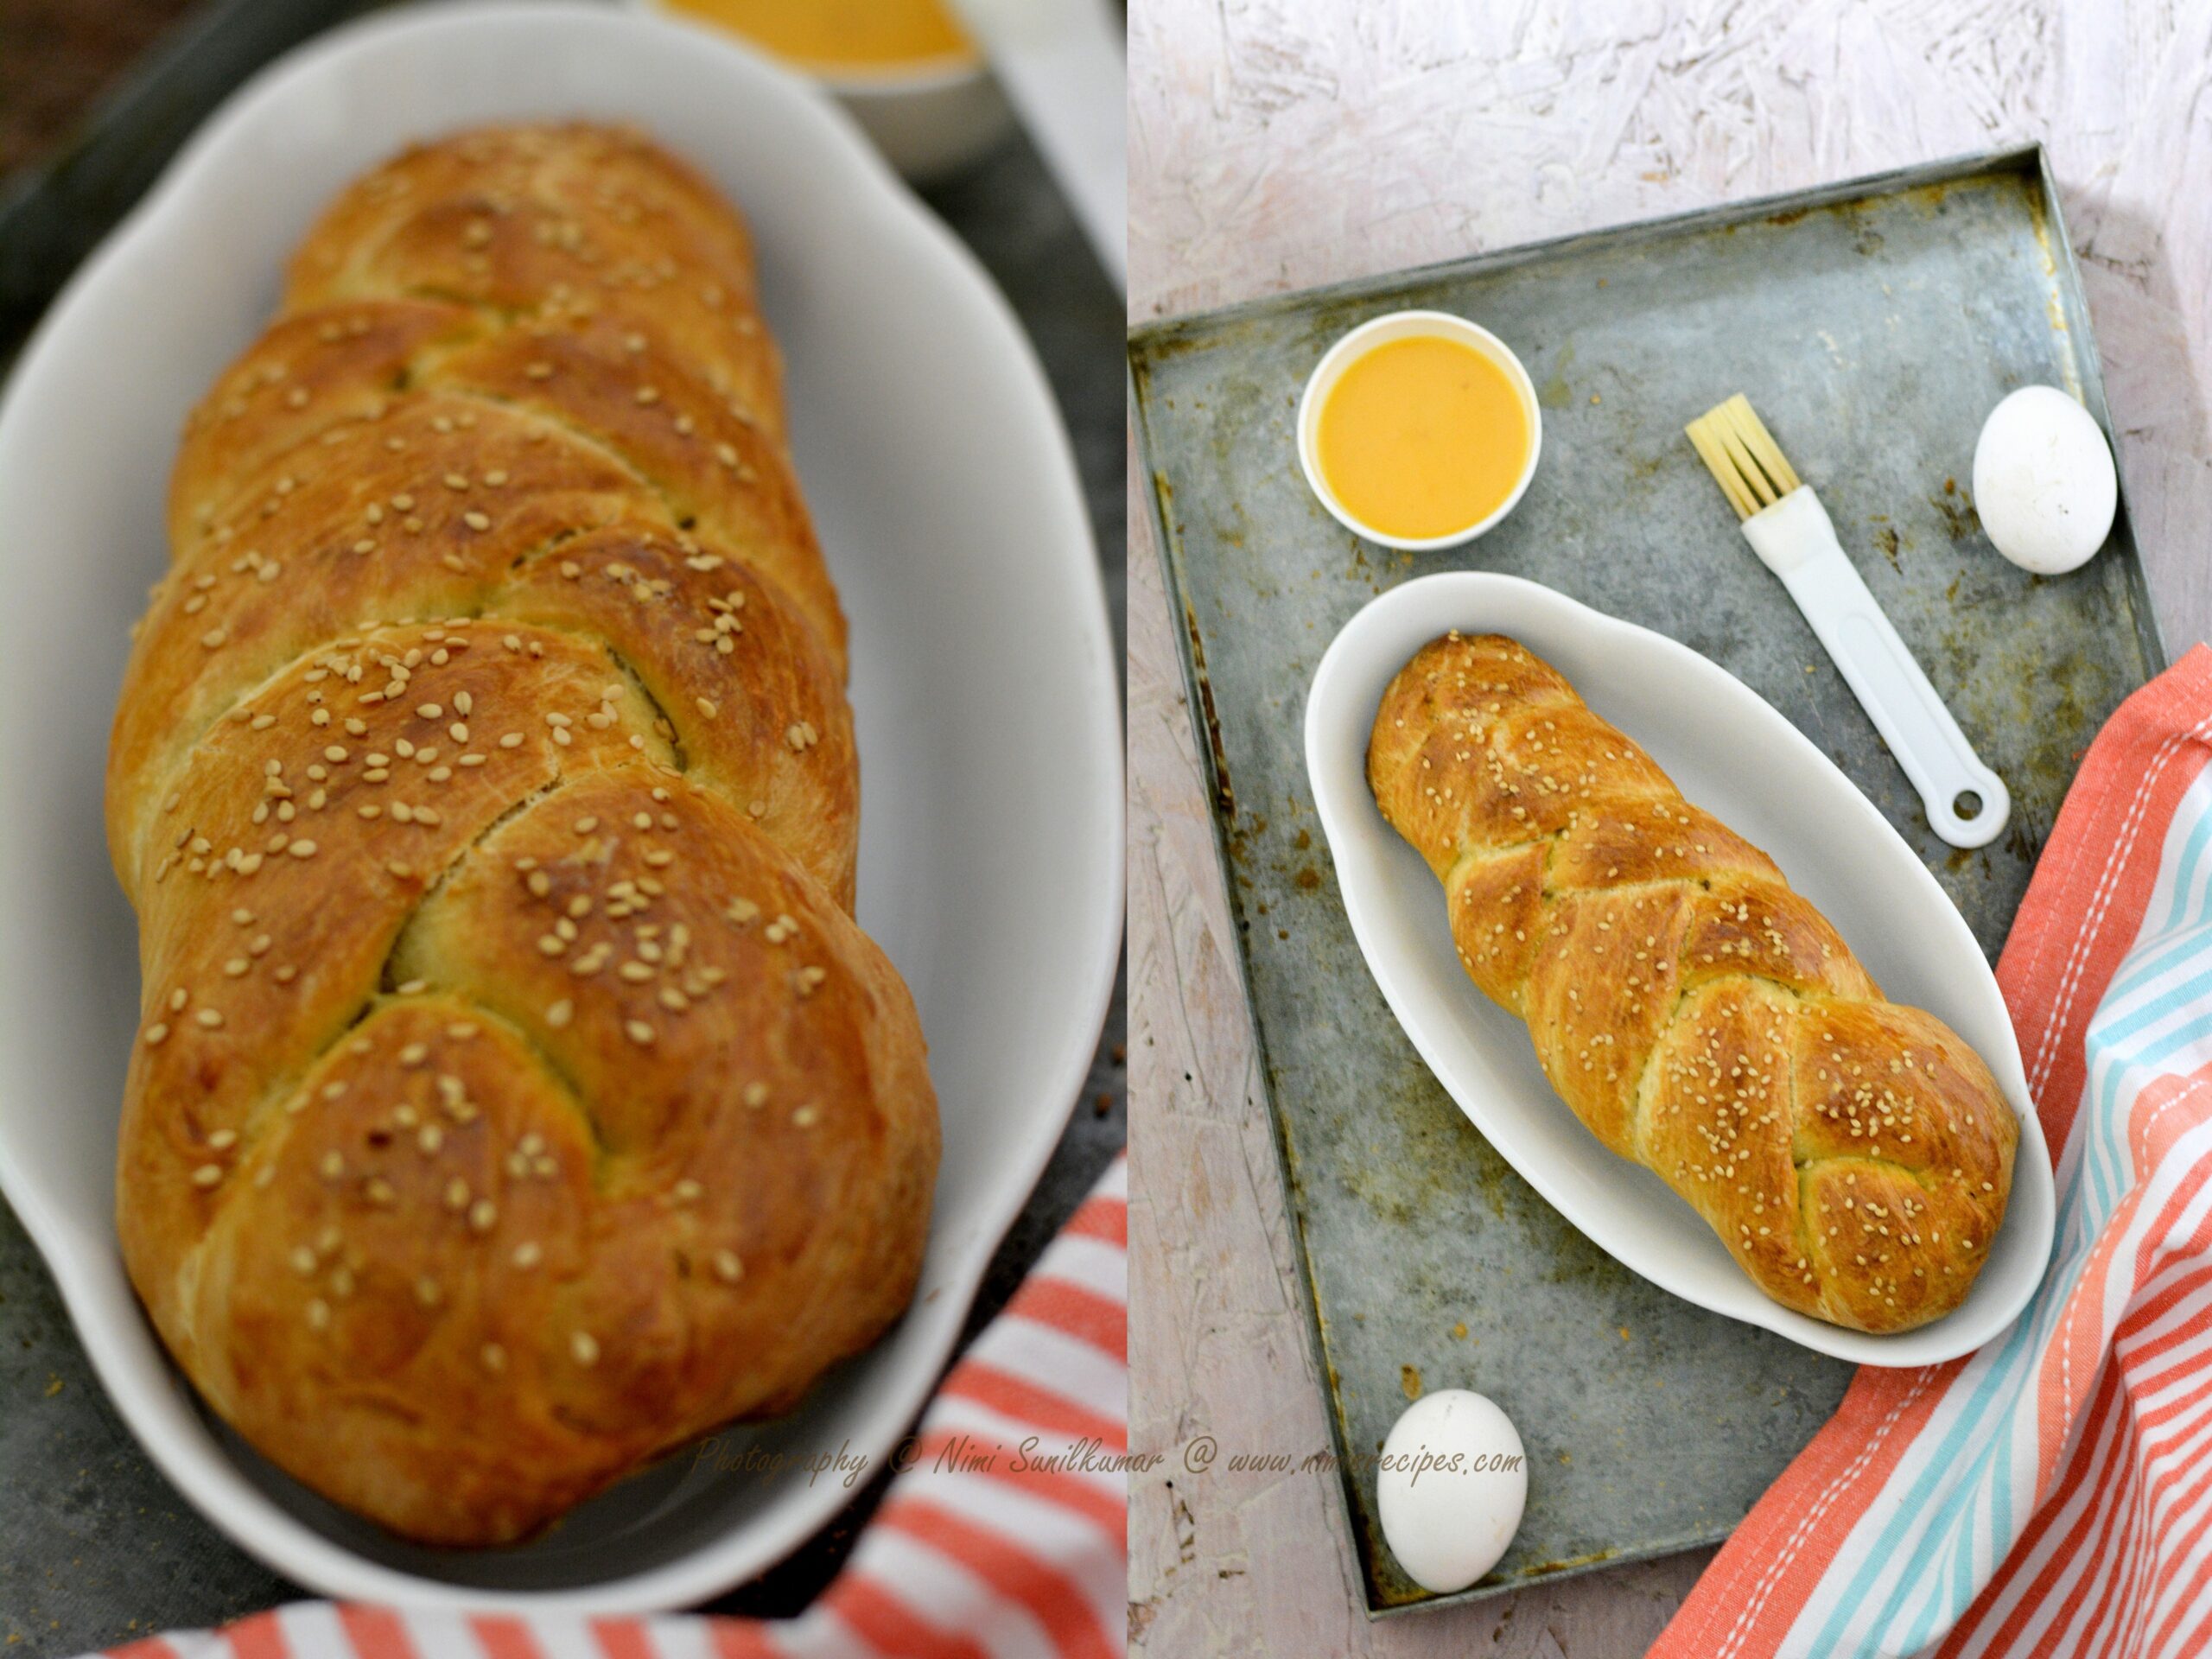
Baking Challah bread..
Hoping all of you are at home and safe with your loved ones. At times like these, we must unite in our fight against Covid_19 and maintain social distancing….take up these moments to spend more time with your family. I am back to my blogging after a pretty long gap. Things have moved on in the past few months. We might be locked up in our homes but there’s no harm in utilizing these days to strengthen up bonds. Here’s a bread that I had baked today for my family. I am so thankful to Orly Ziv for her wonderful recipe from her award-winning cookbook. We met each other at the Gourmand Cookbook Awards in 2014 and have been friends since then.
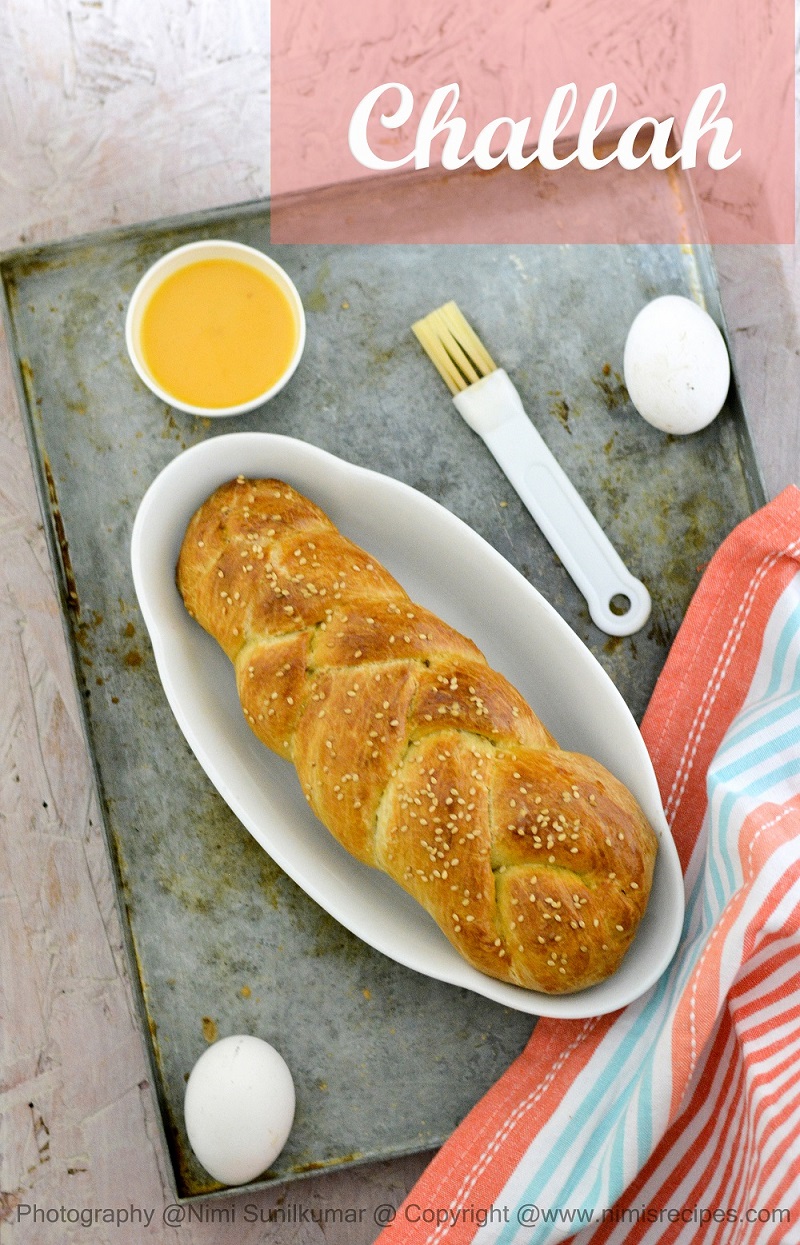
320g water

Pineapple Sheera for Diwali !
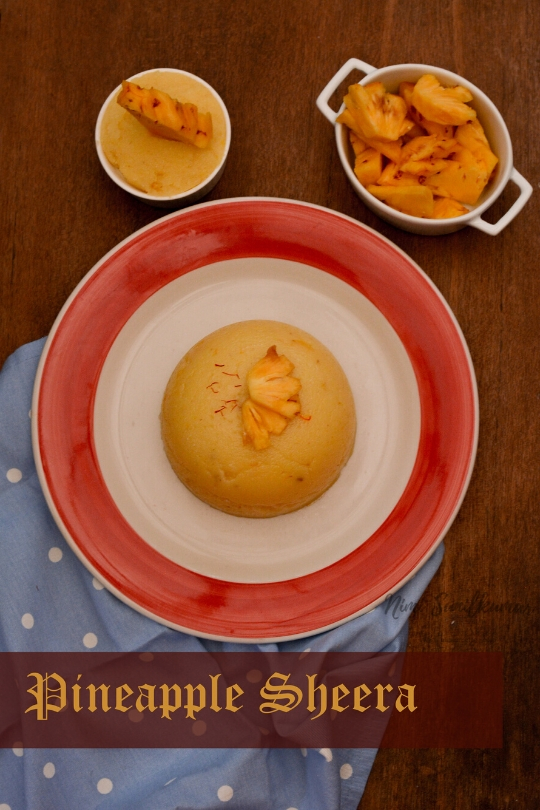
Diwali or Deepavali the festive spirit always symbolizes the spiritual “victory of light over darkness, good over evil and knowledge over ignorance”. This was not a festival that caught a lot of attention in Kerala. But after marriage and relocating myself to Munnar the festive spirits have caught up. For the past many years have been making out a set of Indian sweets. This festive season I thought of sharing with you this quick sheera recipe.
- 1 Cup of Pineapple Puree
- 1 Cup of Semolina
- 1 Cup of Milk
- 3 TBSP of Ghee
- 1 Cup of Sugar
- A pinch of Saffron
- 2 Cups of Water
- A few Cardamoms
- Pour the Pineapple puree into a pan.
- Add 1 TBSP of sugar.
- Mix well and let it simmer for 4-5 mins.
- Keep this aside and heat some ghee into a pan.
- Add the semolina and saute for 5-7 mins.
- Now, keep this pan aside as well.
- Heat some water into a separate pan.
- Add one cup of milk and the sugar.
- Add the saffron and the crushed cardamoms.
- Add the sauted semolina next and mix well.
- Infact, keep mixing, till the mixture becomes thick.
- Next, add the pineapple puree and mix well.
- Transfer into a bowl greased with ghee and mould it on to a plate and garnish with
- pineapple pieces.
Its Waffle time !

Waffles have always been on my to-do list when I started getting involved in cooking. But it took a few years till I got hold of a waffle iron. Here’s a waffle recipe that I normally whip up when I have leftover oats at home. And as my whole family has a craving for peanut butter …I normally don’t miss adding it to my waffle recipe.

- 2 cups of oats
- 1 cup of milk
- 11/2 tsp of vanilla extract
- 2 small bananas
- 1tsp baking powder
- 3tbsp of peanut butter
- 2 eggs
- 2tsps of sugar (optional)
- Butter for greasing
- Preheat waffle iron , puree bananas and keep aside .
- In a bowl add in oats. milk eggs, banana puree , baking powder , peanut butter and sugar .
- Blend all ingredients till it becomes a smooth batter .If the batter seems to be too thick add in around 2-3 tbsps of milk.
- Grease the preheated waffle iron with butter .
- Ladle out the mix on to the hot waffle iron .
- Cook until golden brown .
- Serve hot with dusted powdered sugar and maple syrup .
- Sugar mentioned is optional .I prefer to skip the sugar bit ..but if you would like to have an extra bit of sweetness..you can add the ingredient .

Have you ever had that instance where you have run out of the store-bought batch of maple syrup and you are in a fix of how to recreate the syrup? Heres a quick and simple method of making maple syrup at home.
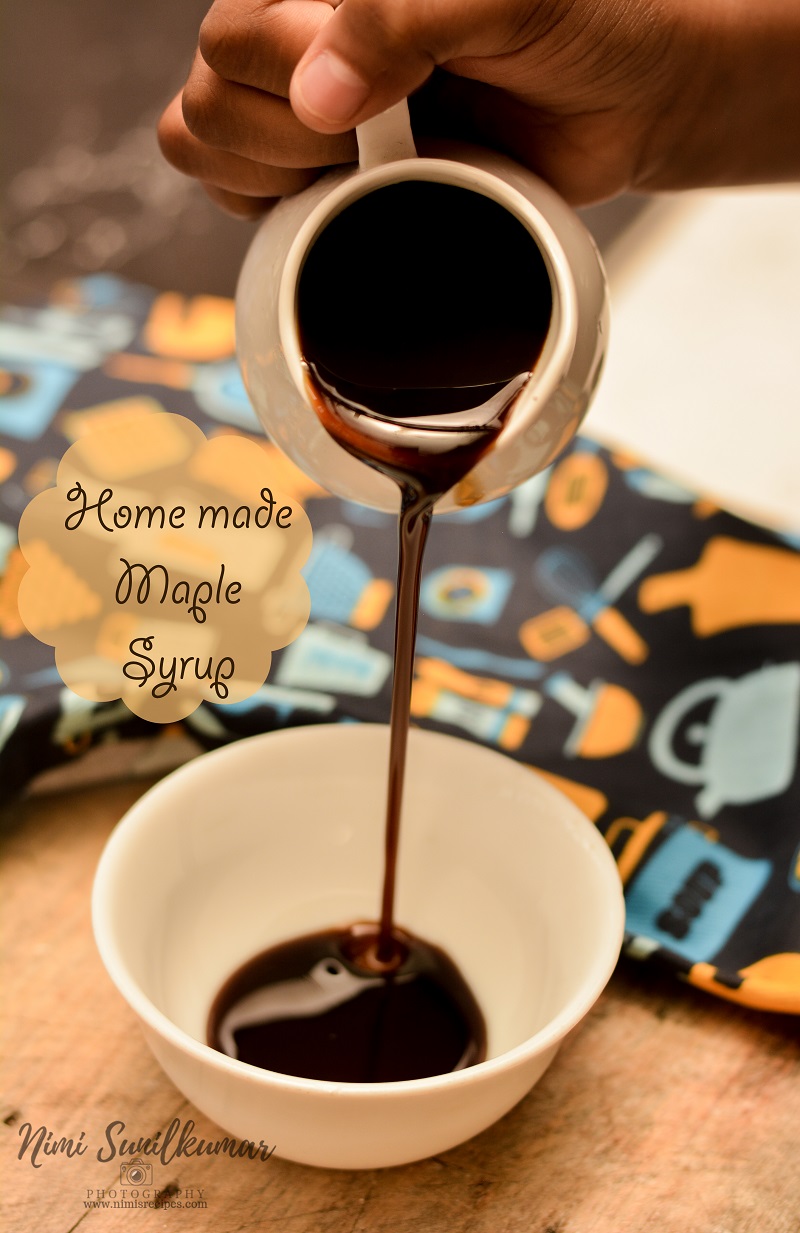
Homemade Maple Syrup
A quick fix syrup that goes well with pancakes, toasts, and waffles.
¼ cup sugar
½ cup brown sugar
½ cup of boiling water
½ tbsp of butter
1/2tsp of vanilla extract or maple extract
Spread out sugar in a flat pan or skillet evenly and start heating on medium heat till all the sugar starts caramelizing.
On caramelizing keep aside.
In a saucepan add brown sugar, pour boiling water and vanilla or maple extract and cook till the sugar dissolves.
Add in the caramelized syrup and continue simmering till it is of thicker consistency.
Take it off the heat and whisk in butter.
Store in airtight containers once cool.
Best served with pancakes, waffles, and toasts.
 Hi! I am Nimi Sunilkumar…an award winning cookbook author /culinary demonstrator/freelance writer / food photographer/food blogger …spiced with the flavors of food..


